Showing posts with label breakfast. Show all posts

Tuesday, October 29, 2013

Famous Kona Inn Banana Bread

 
When my sister was a student at the University of Alabama, the school produced a cookbook entitled, Nothing but the Best!.  It was a beautiful hardbound collection of recipes from the staff, and the cover featured a picture of the President's Mansion, located right in the heart of the school's campus.  Betsy, ever the thoughtful gift giver, got a copy for her and me to give our mom, and it was a huge hit!  Mom loved cookbooks, and this one was extra special because it came from her girls.  Now the book is in Betsy's kitchen, and she and I get to cook from it when I'm in town.
 
This banana bread said it was famous, and I confirmed this with a quick Google search.  Sure enough, the Kona Inn treat is well known, but the recipes vary.  (Some even called for shortening.)  What's the real Kona Inn banana bread?  I have no idea, but I guess it could be this one?  All I know is that this is a delicious recipe, one Betsy knew was a keeper the first time she made it, and one I know you can trust to deliver the results you want in your own kitchen.  With how long it takes to let bananas go bad, measure ingredients, and bake, no one's got time for mediocre.  Just trust me, and let the frangrance of bananas, butter, and all that good stuff fill your home soon.
 
Lastly, Roll Tide!
 
Famous Kona Inn Banana Bread
chefjennylyn.com
 
6 large bananas, ripened
2 1/2 cups plain flour
1 tsp. salt
2 tsp. baking soda
1 cup butter, softened
2 cups sugar
3 large eggs
 
In first bowl, mash bananas and set aside.
In second bowl, sift together flour, salt, and baking soda. Set aside.
In large bowl, cream together butter, sugar, and eggs.  Add dry ingredients and bananas alternately to creamed mixture.  Mix well.
Pour into prepared loaf pans. (2 standard or 4 small)
Bake for 60 minutes or until toothpick comes out clean. (Check after 30 min. for small pans)


I absolutely adore the Pampered Chef Measuring Spoon Set.  They're good and sturdy, but they have proven the most functional spoons I've ever used.  The design of the heads gets them in any spice jar, which you know is a really big deal.  Then there are these little flat parts on the back that let you set the spoons down and leave them full of liquid ingredients.  That's HUGE!


It's always a good idea to crack eggs into a small bowl before adding them to a recipe.  This helps you ensure there's no blood in the egg, but it also leaves you able to get shell out of the egg much more easily.  I used a 1-Cup Prep Bowl for this, and then I put all of the eggs in a Stainless Mixing Bowl for a quick whisking.


Mashing bananas is kind of annoying if you don't have the right tools, but the Mix 'n Chop makes it crazy easy.  This tool was specifically designed for cooking ground beef and sausage in a skillet, but I love it for all kinds of things outside the pan.  Mashing bananas, avocados, potatoes, and more.  Just scroll down to see what it did to this fruit in less than a minute!


Ok, ingredients are prepped and ready.  Bananas are in a Stainless Mixing Bowl, the flour mixture is in a Classic Batter Bowl, eggs are in another Stainless Mixing Bowl, and sugar is in a 2-Cup Prep Bowl.  I've got everything on my Large Cutting Board, which I use regularly to keep my counter clean while cooking.


The Stainless Mixing Bowls and the Scraper Collection are two of my favorite Pampered Chef lines.  Honestly, all three of the bowls and all five of the scrapers end up dirty every time I make a meal.  Then they all go right into the dishwasher for the next use... ah, dishwashers... What did people do without them?


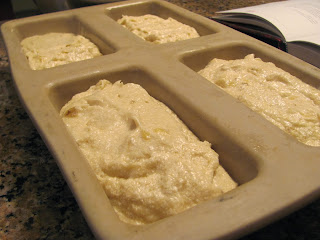
Betsy and I used the Mini-Loaf Pan instead of the standard loaf pans because we each think minis are more convenient.  First of all, the baking time is shorter.  Secondly, you can share bread much more easily (That's important when you consider this is a whole lot of butter and sugar you don't need to keep around).  Lastly, it's super simple to enjoy one loaf and freeze the others for later.  This pan is from the Stoneware Collection, and like the rest of the pieces found there, it heats evenly and delivers perfect baking results.  No hard ends on your bread loaves!

Ok, so there you have it - the banana bread that may or may not be Kona's Famous but is definitely delicious.  Enjoy baking this for yourself or sharing it with a friend.  One tip for sharing: Take people the recipe because you will be asked for it; it's that good.

Like the products you saw used?
Shop Online 24/7 at pamperedchef.biz/jennylyn
E-mail me: chefjennylyn[at]gmail.com
Call me up: (205) 585-2464


Friday, October 25, 2013

Tomato Ricotta Tart

 
This is another recipe from visiting my sister and her husband. You might be wondering about the fact that I'm in another city, yet there are plenty of Pampered Chef products at my disposal. Well, I'm in my 13th year of business, and my sister has been my best customer. In short, cooking at her house is about like cooking in my own. All Pampered Chef all the time. So no, I didn't bring knives on the plane.

Betsy and I sat down and pulled several things we'd like to try from her stack of Cooking Light magazines, and this tart was something we had in mind for a casual sister brunch. That's a funny thought when there's a two-week-old in the house, but ignorance is bliss, right? Well, at least ignorance gets you to buy vine-ripe tomatoes and expensive cheese that you'd hate to see wasted. I had a lunch with a fellow consultant scheduled yesterday, and I didn't want to leave my sister alone without a treat. I was determined to get this cooked and the kitchen cleaned before I left, and I actually accomplished it! Read: This is my disclaimer for the lack of crust prettiness you'll see when you scroll down.
 
 Tomato Ricotta Tart
chefjennylyn.com
 
Crust:
5.6 ounces unbleached all-purpose flour (about 1 1/4 cups)
2 tablespoons pine nuts, toasted and coarsely chopped
1/4 teaspoon kosher salt
1/4 teaspoon baking powder
1/4 teaspoon freshly ground black pepper
1/4 cup extra-virgin olive oil
3 tablespoons ice water
 

Filling:
3/4 cup part-skim ricotta cheese
1 large egg, lightly beaten
2 garlic cloves, minced
1/2 teaspoon kosher salt
1/2 cup chopped fresh basil, divided
1.5 ounces aged Gruyère cheese, shredded and divided (about 6 tablespoons)
1 pound heirloom tomatoes, seeded and cut into 1/4-inch-thick slices
 
Preheat oven to 450°.

To prepare crust, weigh or lightly spoon flour into dry measuring cups; level with a knife. Combine flour and next 4 ingredients (through pepper) in a food processor; pulse 3 times or until combined. Combine oil and 3 tablespoons ice water in a small bowl. With processor on, slowly add oil mixture through food chute, and process until dough is crumbly. Sprinkle dough into a 9-inch glass or ceramic pie plate coated with cooking spray. Press dough into an even layer in bottom and up sides of dish. Bake at 450° for 10 minutes. Remove from oven.

Combine ricotta, egg, garlic, and 1/2 teaspoon salt, stirring with a whisk. Add 1/4 cup basil and 1/4 cup Gruyère cheese, stirring to combine. Spread ricotta mixture evenly over crust. Arrange tomato slices in a circular pattern over ricotta mixture, slightly overlapping. Sprinkle tomatoes with remaining 2 tablespoons Gruyère cheese. Bake at 450° for 25 minutes or until filling is set. Let stand 10 minutes. Sprinkle with remaining 1/4 cup basil.


Above, several ingredients are in the Deep Dish Pie Plate (This one is blue, but it comes in cranberry.), and I've got a Bar Board, a Cutting Mat, The Easy Read Measuring Cups, Measuring Cup Set, and a 4" Serrated Knife ready to go.  Oh, and salt is in a Pinch Bowl.


Have you ever used the Pampered Chef Garlic Press?  If not, let me just tell you it's amazing.  I've had mine since 2000, and it still works perfectly.  You don't have to peel the garlic!  See the garlic coming out of there?  See the picture below with the peel on my Bar Board?  Yep.  Anyway, this is going into the 2-Qt. Stainless Mixing Bowl for my filling mixture.  In the background, I've got the Measure-All Cup and a 1-Cup Prep Bowl.


The Measure-All Cup is one of those products the people who have it want to tell everyone about.  When you go from measuring peanut butter and other sticky ingredients in a standard cup to one that pops it out like a syringe, it's worth talking about.  Here, I've got my ricotta popped and ready to scrape right into my mixing bowl.


I'm just going to admit that Betsy had to help me with her food processor.  I measured out the crust ingredients, but she did the actual mixture for me.  To the right of the processor, I've got Pinch Bowls, Measuring Cups, the Easy Read Mini Measuring Cup, and a 2-Cup Prep Bowl on a Flexible Cutting Mat.  Do you see the nuts we used in the crust?  They're not pine nuts, but have you seen the price on those lately?  When deciding whether to purchase a small jar of pine nuts or twenty ounces of gold, Betsy and I quickly decided the walnuts she already had in her pantry surely couldn't ruin this crust.  You know what?  We were right.


The 4 1/2" Serrated Knife from the Forged Cutlery Collection is my favorite for slicing tomatoes.  The skins are no match for this blade, and the knife is really easy to handle.  I've got the Bar Board for the tomatoes and a Cutting Mat because I just didn't move it out of the way.


This crust could have been pretty, but I was in a rush.  Instead of trying to spread it evenly, I just decided to make sure it would hold filling.  That said, the crust was great!  It can definitely be used for other savory recipes like quiche and... quiche?


Hello, Gruyere!  Ok, so this was delicious!  However, if you already have sharp white cheddar or another cheese you want to try in this recipe, don't feel the need to buy anything else.  The recipe doesn't call for much, and other cheeses will substitute nicely.  I used the Rotary Grater to grate the cheese into an Easy Read Measuring cup.


Spread your filling, layer your tomatoes, grate a little more cheese over the top, and you're ready to bake!  This really was a great recipe, and I can see myself serving it for a fun brunch sometime.  This is woman food at its best!
 
Like the products you saw used?
Shop Online 24/7 at pamperedchef.biz/jennylyn
E-mail me: chefjennylyn[at]gmail.com
Call me up: (205) 585-2464


Tuesday, June 12, 2012

French Toast with Espresso Cream


What do you do when you have a loaf of French bread left from a dinner party?  Search for a new French toast recipe, of course!  I'd clipped this from a recent Rachael Ray magazine, and I was pretty excited to see I had all the ingredients available.  I like French toast.  I like espresso flavors.  What could go wrong?  Other than letting my butter get too hot on the second batch, nothing!  If you're in the mood for a fun recipe to try on a lazy weekend morning, I've got you covered.

French Toast with Espresso Cream
chefjennylyn.com

2 tbsp. instant espresso powder
1/2 cup hot water
1 cup sweetened condensed milk
4 eggs
1/4 cup heavy cream
1/4 tsp. salt
8 1/2-inch thick slices challah bread (I used French)
4 tbsp. unsalted butter

In a small bowl, whisk the espresso powder with 1/2 cup hot water.  Reserve 2 tbsp. of the liquid.  Whisk the condensed milk into the remaining espresso liquid.

In a baking dish, whisk together the eggs, cream, salt, and reserved espresso liquid.  Add the bread slices to the dish, and turn to coat.

In a large nonstick skillet or griddle, melt 2 tbsp. butter over medium heat.  Add 4 slices of bread and cook, turning once, until golden-brown, about 5 minutes.  Repeat with the remaining 2 tbsp. butter and 4 bread slices.

Serve warm, drizzled with espresso cream.


The Bread Knife makes quick work of, well, slicing bread.  I know that sounds simple, but have you ever tried slicing French bread with a regular knife?  I rest my case.  Anyway, this is on the Large Cutting Board which is resting over the kitchen sink for added space.


As always, my ingredients are prepped and ready to go.  Trust me when I say this saves a lot of trouble once you begin assembling the recipe.  The espresso mixture is in a Prep Bowl, and the heavy cream is in the Mini Easy Read Measuring Cup, a fabulous tool which measures up to 1/4 cup (4 tbsp.).  Then I've got eggs in a Small Batter Bowl with a Stainless Whisk.  The Stainless Mini Whisk is beside the Prep Bowl, and I utilized both the Measuring Spoons and the Adjustable Measuring Spoons.


I can't say enough about the Smooth-Edge Can Opener.  This picture explains much better than my feeble attempt at explaining the tool's true awesomeness.  Smooth edges.  No gunk on the can opener.  No lid going in the food.  Ah, it seems too good to be true... but it's just the Pampered Chef.


This step feels kind of gross, but the result is worth it.  Dip the bread, flip the bread, fry the bread.  My Double Burner Griddle says, "Load me up!"  I say, "OK!"


Does the site of butter and French toast sizzling make you feel all warm and fuzzy inside?  Let's be friends.

Like the products you saw used?
Shop Online 24/7 at pamperedchef.biz/jennylyn
E-mail me: chefjennylyn[at]gmail.com
Call me up: (205) 585-2464


Thursday, October 20, 2011

Pumpkin Scones with Maple Glaze

Drooling? Me, too. I used to hate scones, but that's because I'd only been exposed to a few with the texture of a dog biscuit. As I've expanded my horizons, I've come to realize scones are amazing when baked correctly, and there are all kinds of crazy things you can do with them. Things like stuffing them full of Oreos. If you have half a cup of pumpkin on hand, these scones will be a good decision. If you don't have half a cup of pumpkin, going to the store and getting it will be a good decision. Seriously, do it.

(Displayed on pedestal from Trifle Bowl)

Pumpkin Scones with Maple Glaze
chefjennylyn.com

2 cups all-purpose flour
1/2 cup sugar
1 tablespoon baking powder
1/2 teaspoon salt
1/2 teaspoon ground cinnamon
1/2 teaspoon ground nutmeg
scant 1/4 teaspoon ground cloves
1/4 teaspoon ground ginger
6 tablespoons cold butter
1/2 cup canned pumpkin
3 tablespoons buttermilk, plus a few extra teaspoons if the dough is too dry
1 large egg

Pre-heat the oven to 375 degrees.

Combine the flour, sugar, baking powder, salt, and spices in a large bowl. Using a pastry knife, fork, food processor or your hands, cut butter into the dry ingredients until mixture is crumbly and no chunks of butter are obvious. Set aside.

In a separate bowl, whisk together the pumpkin, buttermilk, and egg.
Fold the wet ingredients into the dry ingredients.

Form the dough into a ball. Cut in half. Pat out each dough ball onto a lightly floured surface and form them into 1-inch thick circles. Use a large knife or a pizza cutter to slice the dough into eighths. Place on prepared baking sheet.

Bake for 14 or 15 minutes. Scones should begin to turn light brown. Remove from oven and let cool on baking sheet. Makes 16 scones. (Jenny-Lyn's note: I made mine huge and only got 8.)

Maple Icing

1/4 cup butter
1/4 cup brown sugar
1/4 cup white sugar
1/4 cup heavy cream
2/3 cup powdered sugar
1 teaspoon maple flavor

In a large saucepan melt the butter, brown sugar, white sugar and heavy cream. Bring to a low boil, turn off heat and let sit for 20 minutes. Whisk and add in 2/3 cup powdered sugar and the vanilla. Whisk until smooth. Frost scones.


Let's start with the Smooth-Edge Can Opener. So many of my customers have purchased one for themselves and come back for more after using it. If only I had a dollar for every time I've heard, "I've got to get one of those for my daughter-in-law!" But seriously, this is the best can opener in the world. Smooth can edges, crust-free opener... win.

Look familiar? Yes, pretty much every baking experience begins the same way for me, but this is the reason I still enjoy it. I'm quick and efficient because I don't stop in the middle of a recipe to find a random ingredient. Nope, I get it all out at the beginning and then just add things as the recipe directs. It's a great method, and I highly recommend it. Here's what I'm using: Pinch Bowls, Measuring Spoon Set, Adjustable Measuring Spoons, Measuring Cup Set, Easy Read Mini Measuring Cup, Measure-All Cup, Stainless Mixing Bowls, Korintje Cinnamon, Large Cutting Board. I love kitchen tools.

The Pastry Blender is a must-have for cutting butter. Before I had this, I shyed away from anything that involved this step because it was so annoying with a fork. Butter = happiness.

Since I was making pumpkin scones, I decided to get crazy and cut them out with my new pumpkin cutters, a Pampered Chef Outlet find. The set comes with a pumpkin, a ghost, and a bat, and it's only available until the 31st. Less than two dollars! Unfortunately, I made my scones super thick and lost the pumpkin stems in baking. These are on the Rectangle Stone from the Stoneware Collection, and that's what I credit with their perfect baking. The bottoms were beautifully golden to match the tops, and the insides were moist. Put simply, perfection happened in my kitchen.

I'll be repeating these on a regular basis. This recipe is a home run with no room for improvement. The pumpkin flavor is clear without being overwhelming, and the maple glaze compliments it perfectly. If you find yourself searching pumpkin scone recipes online, stop now. The internet has led you to a good place.

Like the products you saw used?
Shop Online 24/7 at pamperedchef.biz/jennylyn
E-mail me: chefjennylyn[at]gmail.com
Call me up: (205) 585-2464


Wednesday, August 17, 2011

Double Chocolate Banana Bread

When bananas rot in my kitchen, which is common in an Alabama August, they typically become this bread. How's that for an opening sentence? Ok, so seriously, this is the best banana bread I've ever had. When it comes to quick breads, I'm one of the pickiest people you'll ever meet. Considering the amount of calories they pack per slice, these things have to blow my mind in order for me to eat them. Hence the reason I keep going back to this one. It's good enough that I can't keep it in my house but instead find poor, unsuspecting pregnant women to "gift." I originally found this recipe at Savory Sweet Life, and all I can say is that Alice, the site's author, hit a home run here. I'm talking out of the park, people. So now just find a pregnant friend, bake her this bread, and get ready to provide her the recipe.

Double Chocolate Banana Bread
chefjennylyn.com

1 stick salted butter, softened
1/2 cup sugar
1 egg
2 large overripe bananas, mashed
1 tsp. vanilla
1 cup flour
1 tsp. baking soda
2 tbsp. cocoa powder
1/2 cup sour cream
1 cup mini-chocolate chips (or regular)


Preheat oven to 350 degrees.

Lightly grease a 9x5 loaf pan or 2 mini-loaf pans.

In a large bowl, cream butter and sugar until fluffy. Stir in egg, mashed bananas, sour cream, and vanilla until well blended.

Add baking soda, cocoa, and flour. Mix everything until well incorporated. Add chocolate chips... and 1/2 cup of nuts if you're weird and enjoy nuts in your bread.

Pour batter into loaf pan(s), and bake 50 minutes - 1 hour or until tester comes out clean. Remove from heat, and allow bread to rest 10 minutes before flipping from pan.


I know I talk about the Measuring Cup Set pretty often, but I really love these for baking. The leveler tool ensures you're not over measuring, which can quickly ruin a recipe. If it's worth baking from scratch, it's worth measuring correctly.

With the amount of chocolate flavor this bread packs, you wouldn't think it only calls for two tablespoons of cocoa powder, but I've heard weirder things. I'm nuts for the Measuring Spoon Set because they're heavy duty, and they nest inside one another for simple storage. Plus, this set includes a 1/2 tablespoon measurement - how cool is that?

Surprise - I like prep work! To save you a really long paragraph about life with kitchen tools, here's a rundown of what's going on here: Small Mix 'n Scraper, Measuring Spoon, Adjustable Measuring Spoon, Pinch Bowl, 1-Cup Prep Bowl, Vanilla, Measuring Cups, Easy Read Measuring Cup, Measure-All Cup, Stainless Mixing Bowls, Stoneware Loaf Pan, Large Grooved Cutting Board.

Friends, I give you the Mix 'n Chop. This is one tool I was unsure of when it was introduced to the product line a few years ago, but I've become a believer. Not only is it great for things like mashing banana and making guacamole, but it can't be beat when it comes to breaking up ground beef or sausage in a saute pan. It won't melt in your cookware, either! I'm getting these poor bananas prepped in a small Stainless Mixing Bowl.

The Measure-All Cup is easily one of my most popular products. Once you start using this for all your gross-to-measure ingredients, you'll understand why it's a staple in my kitchen. Push it to the measurement you want, fill it with something nasty, and push said ingredient out. You don't have to dig anything out of a standard measuring cup!

How about another picture of something going into the batter? The Easy Read Measuring Cups have changed many lives, especially those of older people who have trouble balancing measuring cups when they're dealing with liquids. I don't say that to be rude, but it's true. I love that I can offer something my grandmother says has made a difference in her kitchen. Even though she's got 80+ years of kitchen tools, she can still find something that makes cooking easier! The Mix 'n Scraper is what's making this batter happen, and I can't imagine making this without it, especially when it comes time to scrape the bowl.

I need to say this about when I use the Stoneware Loaf Pans, Mini Loaf Pan, and Fluted Pan. Breads and cakes are tricky, so I always rub my pan with butter or shortening to ensure a full release. Over time, Stoneware becomes seasoned and doesn't require any greasing, but I'm always a "better safe than sorry" girl when it comes to recipes like this. Take a look at the next picture, and you'll see why it's just a good idea.

Behold: the perfect loaf of double chocolate banana bread. Run the Skinny Scraper around the edges of the Stoneware Loaf Pan, and invert the bread onto the Cooling Rack. Notice the perfectly browned edges, the even baking, the fact that the entire loaf came out in one piece. Can we say perfection?

Go ahead, let some bananas rot. Get ready to love them in another form, this time smothered in chocolate goodness.

Like the products you saw used?
Shop Online 24/7 at pamperedchef.biz/jennylyn
E-mail me: chefjennylyn[at]gmail.com
Call me up: (205) 585-2464


Wednesday, August 3, 2011

Cinnamon Sugar Scones

Scones... You probably know my history with scones and how I later realized they really aren't bad, especially if they're made with the base for this recipe. If you don't know that story, here it is. Anyway, this is a cinnamon sugar version of Baked Perfection's fabulous recipe, and I feel the need to warn you these are dangerous. You make them without knowing just how good they're going to be, and you end up sick from sugar overload when you couldn't limit yourself to one. Experience speaks loudly, my friends.

Cinnamon Sugar Scones
chefjennylyn.com


2 cups flour
3 tablespoons sugar
1 tablespoon baking powder
1/2 teaspoon salt
2 teaspoons cinnamon
1 1/4 cups heavy cream

Glaze:
1 cup powdered sugar
1/2 teaspoon vanilla
1/2 teaspoon cinnamon
1-2 tablespoons milk


Preheat oven to 400 degrees.

Mix flour, sugar, baking powder, salt, and cinnamon. Add heavy cream, and stir just until combined. (Mixture will be sticky, so don't think you're an idiot just yet.) Flour a surface, and pat the dough out; cut into shapes. Place scones on a pan, and bake 9-11 minutes. Let cool five minutes before glazing.

For glaze, stir ingredients until you reach a thin icing consistency. Pour or drizzle over warm scones.

Recipe adapted from Baked Perfection


If you've seen one picture of prep work, you've seen them all. If you've followed my blog long, you've seen a lot of prep pictures... tons of them. I'll repeat myself simply because this is true: Prep work makes recipes go more quickly, and it makes cooking and baking fun instead of annoying. Think Rachel Ray would look cool if she dug out all her ingredients as she prepared recipes? Didn't think so. So.... Stainless Mixing Bowl with Measuring Cup and leveler tool inside. Pinch Bowl full of sugar (yum!), Adjustable Measuring Spoon, Measuring Spoons, Easy Read Measuring Cup, Large Cutting Board, and Korintje Cinnamon.

Korintje Cinnamon from the Pampered Pantry is the star of this show. I have to admit that once you've used this for all those fab recipes featuring cinnamon, it's difficult to use other brands. My friend Christopher has started adding this to his family's Saturday morning pancake batter (yes, there are cool dads out there who make pancakes for the wife and kids), and he said it's fantastic!

Ok, so there's not a lot to explain about mixing this dough together, but I need to warn you again it's crazy sticky. I mean like stick...eeee. So just know that going in, and you'll have a great experience. Sometimes I cut scones in circles using my Biscuit Cutters, but this time I felt like cutting them in miniature triangles. I got a little crazy and caused them to lose shape while they baked, but you get the point. So I separated my dough on the floured Large Cutting Board (thanks, Flour/Sugar Shaker) and cut it in scones using the 7" Santoku Knife from the Forged Cutlery Collection. Flour your knife blade for easy cutting. I baked these guys on the Rectangle Stone from the Stoneware Collection for amazing results. And I mean amazing results.

One thing I love about the Easy Read Measuring Cups is that you can use them as mixing bowls when needed. I measured my powdered sugar in here and just added everything else. This is where the Korintje Cinnamon really got to shine...cinnamon glaze sauce icing stuff. Oh, my! I mixed it all with the Skinny Scraper and was ready to go!

Ok, best glazing station ever. Put a towel or paper towels under the Cooling Rack, glaze warm scones, and throw the rack in the dishwasher. What about that leftover glaze that needs to be scraped from the sides of my measuring cup? Well, that's another story for another day, but I will say I gained a few pounds after making these.

Check out those bottoms! Stoneware is the best stuff ever! These scones will absolutely melt in your mouth, guaranteed. They're best enjoyed with a friend for sure! My friend Courtney and I used to make brunch together before she moved to Thailand, and this recipe always makes me think of the day we did scones and cheese grits. Odd combination? This is the South, and anything goes with grits at any time. Don't judge.

Ok, so these are good. Their goodness is trumped only by their easy preparation. If you don't make them, it's your loss, but you should at least pass the recipe to others so they can enjoy the world's best, easiest cinnamon sugar scones. Enjoy!


Like the products you saw used?
Shop Online 24/7 at pamperedchef.biz/jennylyn
E-mail me: chefjennylyn[at]gmail.com
Call me up: (205) 585-2464

Wednesday, June 8, 2011

Browned Butter Berry Muffins

Here's the thing... I picked strawberries with my best friend Elizabeth recently. Lots of them. Get ready for a few strawberry recipes because I just don't know what else to do. I mean, I came home with a gallon of strawberries that are ripe... like the kind of ripe where they'll die if I don't use them quickly. So we come to the first of many strawberry recipes: Muffins. Not just any muffins, mind you. Browned butter strawberry muffins adapted from these browned butter blueberry muffins I found at Joy the Baker. Scroll down, and you'll see that I also made a batch of blueberry to accompany the strawberry. You know, for comparison purposes and all. Between you and me, I'll always like blueberry muffins better than any others, but this strawberry version will definitely find its way to my life again... probably after next year's harvest.

Browned Butter Berry Muffins
chefjennylyn.com

7 Tablespoons unsalted butter
1/3 cup whole milk
1 large egg
1 large egg yolk
1 teaspoon vanilla extract
1 1/2 cups all-purpose flour
3/4 cup sugar
1 1/2 teaspoons baking powder
3/4 teaspoon salt
2 cups fresh berries
For the Topping
3 Tablespoons cold, unsalted butter, cut into 1/2-inch cubes
1/2 cup all-purpose flour
3 1/2 tablespoons sugar
Put a rack in the upper third of the oven and preheat oven to 375 degrees F. Line muffin pan with paper or foil liners
Melt butter in a small saucepan over medium heat. Keep an eye on the butter. Melt and cook down the butter until little brown bits appear in the pan. The crackling will subside and butter will begin to brown fairly quickly after that. Keep a close eye. Remove from heat.
Whisk milk, egg, yolk and vanilla until combined. Add the brown butter and stir to combine.
Whisk together flour, sugar, baking powder and salt in a medium bowl Add milk and butter mixture all at one and stir gently to combine. Gently but thoroughly fold in the berries.
Divide the batter among muffin cups and spread evenly.
To make the topping combine all of the ingredients in a bowl and blend until crumbly. (A pastry blender works best.) Sprinkle evenly over the batter in the cups.
Bake until golden and crisp and a wooden pick inserted into the center of a muffin comes out clean, about 18-20 minutes. Cool in pan on a rack for 15 minutes before removing from the pan. Serve warm or at room temperature.
------

Like I said, I got this recipe at Joy the Baker. She got it from The Gourmet Cookbook.


I used to be intimidated by scratch baking. Now I don't understand what the big deal is, especially considering the results achieved through the little bit of extra effort. Besides, baking is relaxing if you take time to do it. So let's get started... Here are the products shown: Measuring Cup Set, Measuring Spoon Set, Adjustable Measuring Spoons, Easy Read Measuring Cup, Double Strength Madagascar Vanilla, Stainless Mixing Bowls, Large Cutting Board. By measuring everything out before mixing anything, you don't have to worry about forgetting ingredients or adding them twice. Ever started measuring salt, taken a phone call, and forgotten whether or not you already added it to a flour/sugar mixture? Considering what doubling the salt will to to baked goods, it's not a risk I'm willing to take.


This is what browned butter looks like. The recipe directions are very specific about how to do this, but just know it might take a little bit longer than you'd expect. Be patient, but be watchful. Browning butter brings out its nutty flavor, and it makes baked goods more complex and less run-of-the-mill. Also, it makes the kitchen smell good. This is the 1.5-Qt. Saucepan from the Executive Cookware Collection, and that's the Mini Mix 'n Scraper full of butter. I'm in love with all of the scrapers, and I adore the fact that I can leave them in pans without worrying about melting. Yes, this hung out in the butter the entire time it cooked. Silicone, baby!

Pop quiz: What's the thing full of strawberries called? Is it a bucket? Is it a basket? Neither. According to the box at the strawberry farm, this, my friends, is a busket. That tidbit of knowledge was worth the long drive, the hard picking, the sweltering heat, and the price of the berries. Did I mention the sweltering heat? This is Alabama. Ok, so it's time to get intimate with these berries, inspecting them for imperfections, cutting their tops off, that kind of thing. I'm using the Large Cutting Board laid across my sink, and the 3 1/2-inch Paring Knife is going to make quick work of cutting. Well, not quick, but it will take a lot less time than any other knife. My strawberries are in the Colander & Bowl Set, and I'm going to measure them into an Easy Read Measuring Cup.

And just like that, I've got two cups of berry pieces. My dry ingredients and egg mixture are in separate Stainless Mixing Bowls, and I'm about to whisk them together using the Stainless Whisk.

You'll see a picture similar to this one anytime I post cupcakes or muffins. The Stoneware Muffin Pan combined with the Large Scoop make for perfection every time.


For the topping, combine the cold butter, extra flour, and extra sugar, and use the Pastry Blender to mash it up. The key to a good topping: Do. not. let. your. butter. get. soft. That's why I never use my hands for a job like this. For one, I get butter and stuff all under my fingernails, and that's just nasty (for me and for you), but the main thing is just that the heat of my hands melts the chunks. So use a Pastry Blender, and thank me later.

Hey, those don't look like strawberries! This is the Stoneware Muffin Pan of blueberry muffins, and I didn't want these guys to feel left out. They were amazing! The thing about these that made me so happy was that each muffin was pretty much overloaded with fruit. Note: This is not my way of saying each muffin was overloaded with healthy, just that you don't get jipped on the blue (or - let's just be honest - purple).

All of the muffins are loaded up and ready to go! I took these to my Sunday school class, and I was pleased that I didn't come home with leftovers. A clean plate is a nice compliment, especially when it started off with 24 full size muffins in a room full of people who already ate breakfast.

Take your favorite fruit, add it to this batter, and prepare to write a letter professing your love for me. I'll understand completely.

Like the products you saw used?
Shop Online 24/7 at pamperedchef.biz/jennylyn
E-mail me: chefjennylyn[at]gmail.com
Call me up: (205) 585-2464