Sunday, September 7, 2014

My Favorite Guacamole


I'm super excited to share my favorite guacamole recipe ever.  That is all.

(The above picture shows this served in a Small Bamboo Bowl on the Bamboo Cracker Tray with sweet potato chips I made using the Ultimate Mandoline and the Microwave Chip Maker.  That method will be in another post sometime.)

My Favorite Guacamole
chefjennylyn.com

2 ripe avocados, mashed
4 small tomatoes or a handful of grape tomatoes, diced
1/2 of 1 large jalapeno, seeded and chopped
1/2 cup cilantro, chopped
1/2 cup green onions, chopped
2 tbsp. fresh lime juice
1/2 tsp. hot sauce
Salt, to taste

So the directions here are pretty simple.  Mix everything together, and enjoy.


The best tip I can ever give anyone interested in cooking at home more often is to get everything out at the same time.  It's frustrating to work through a recipe and pull ingredients right when you need them.  For one, you can forget things that way, and two, it just makes cooking kind of willy-nilly.  By getting everything out at once, you can streamline the part where you actually put the recipe together.

Above, I have my Measuring Spoon Set, a 1-Cup Measure-All Cup, my Manual Food Processor, my Bamboo Salt and Grinder Set, the Herb Keeper, Professional Shears, a Stainless Mixing Bowl, the Mix 'n Chop, a Citrus Press, two Forged Knives, a Mix 'n Scraper, the Avocado Peeler, and my trusty Large Cutting Board.  Let's do this.


All I can tell you about working with jalapenos is that you should wear gloves.  I learned the hard way to never, ever dig seeds out with your bare fingers, but today I also learned that cradling a hot pepper in your hand can lead to a delayed burning sensation on that tender skin between your thumb and pointer finger.  Don't be a hero.  Wear gloves.  Anyway, you definitely want to remove the seeds, and a spoon is perfect for doing so.  I sliced this pepper with the 5" Santoku Knife from the Forged Cutlery Collection.


The 4 1/2" Serrated Knife from the Forged Cutlery Collection is the ultimate for slicing tomatoes.  It breaks through the skin without smashing the... fruit?... vegetable?... Eh, whatever.


When I have multiple ingredients that need to be chopped, I throw them all in the Manual Food Processor together.  The cilantro, jalapeno, and green onions have all been swirled together to create a family of green awesomeness.  Note: I cut the pepper and onions into chunks before putting them in the processor.


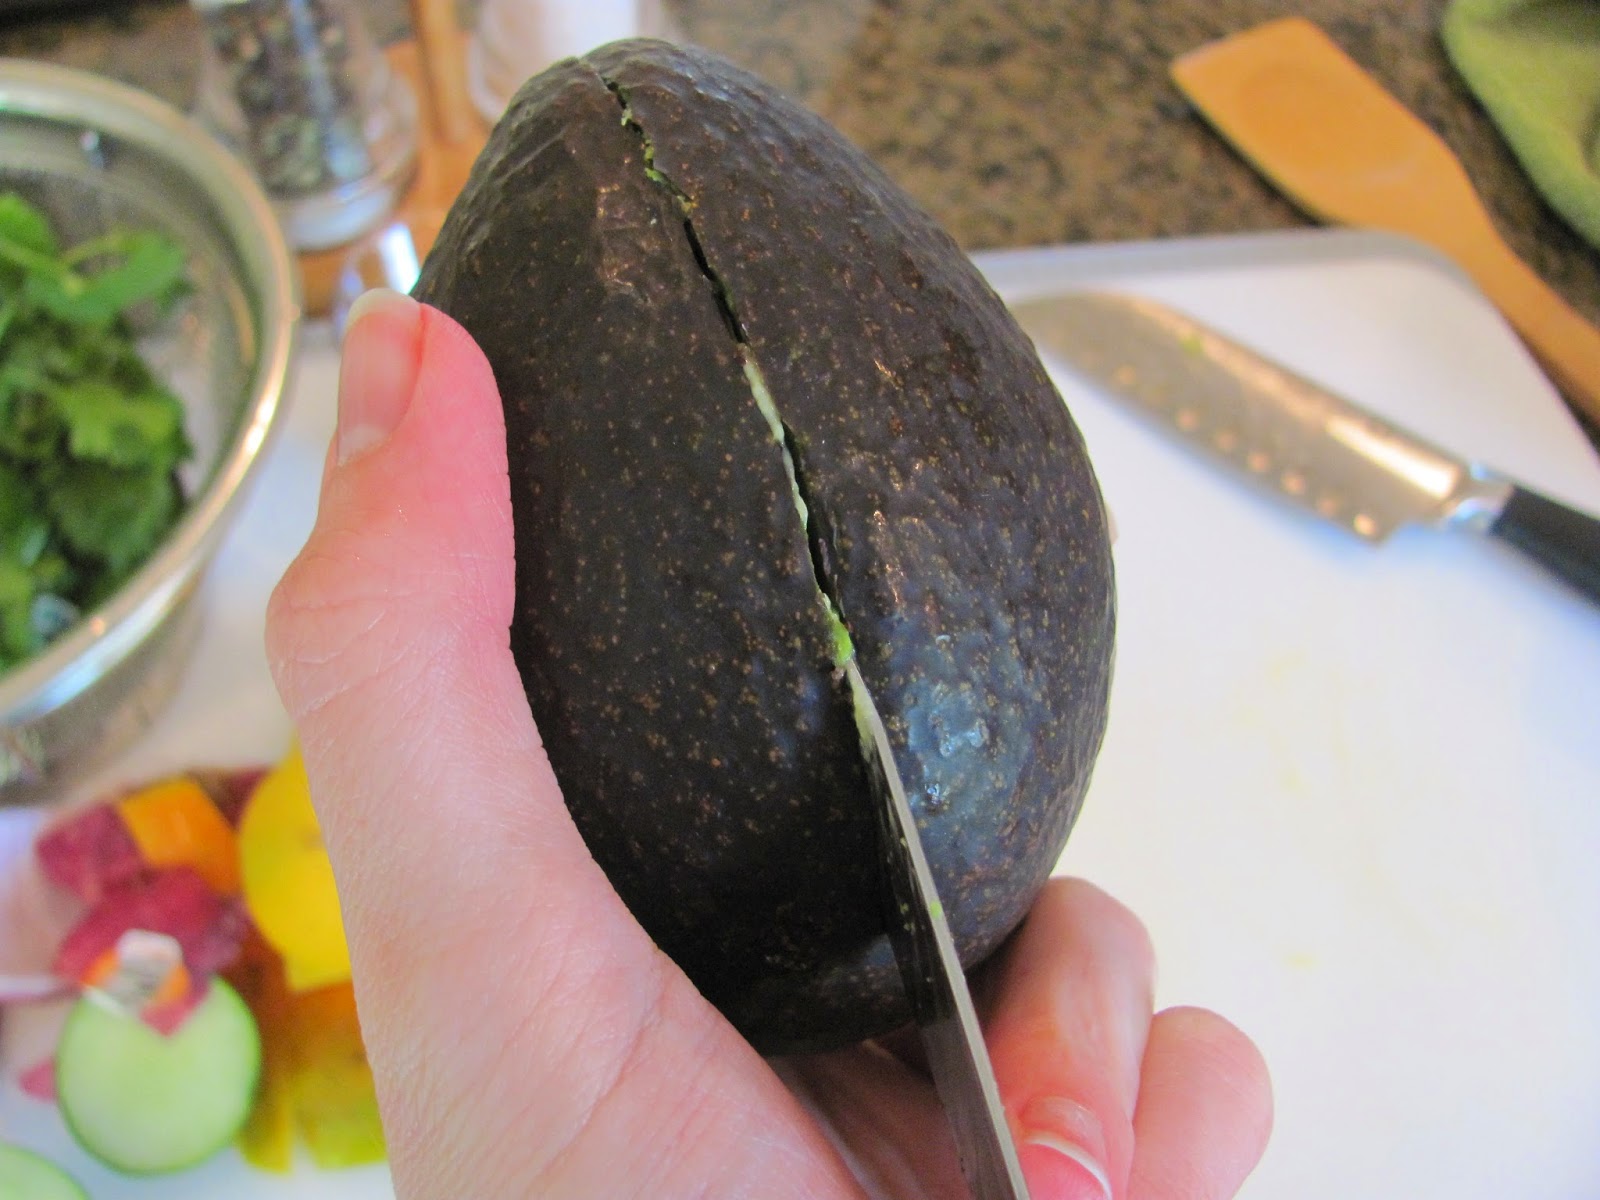
I'm kind of shocked by the number of people who are intimidated by avocados.  First of all, let's talk about how to choose a ripe one.  It should give a little when you squeeze it, but it shouldn't be mushy.  If it feels like mush, you might have a mess inside.  If it feels as hard as a rock, give it a couple of days to turn to perfection.  Ok, for peeling, you just stick the Avocado Peeler in the side and let the large pit guide you all the way around.  Then you separate the two sides, and you end up with what you see below.  Scroll for the next step.


Remove the pit, and simply outline the meat, popping it out of the peel.  Done!  (If you want slices or cubes, just cut them while still inside the peel, and then pop them out.)


Mash the avocado with the Mix 'n Chop, and add everything else.  Here, I'm squeezing my lime juice with the Citrus Press.  You know what?  I've seen the Citrus Press featured in "Stuff chefs can't live without" type articles in three major food magazines over the last few months.  Get a Citrus Press, people!  Moving on... Isn't this looking beautiful now?


I'm using my favorite Stainless Mixing Bowl, the Mix 'n Scraper, and a Bamboo Grinder full of Pampered Pantry Himalayan Sea Salt.  The bowl is big and wide to ensure ingredients get mixed, the scraper keeps from anything being left on the sides, and the high quality salt says, "This guacamole was made with l-o-v-e." From here, taste, add more salt or lime juice if needed, and call it a day.  Your guacamole is ready to be enjoyed! 


One last picture and a tip for storage.  Put a pit inside, and cover the avocado with plastic that actually touches it.  Then cover your container with its lid.  This will maximize the time you have before your guacamole turns brown.

I'll let you know how things go over these next few weeks.  For now, let's all just enjoy guacamole deliciousness!


Like the products used?
Shop Online 24/7 at pamperedchef.biz/jennylyn
E-mail me: chefjennylyn[at]gmail.com
Call me up: (205) 585-2464


Friday, August 15, 2014

Perfect Beef Tenderloin


Beef tenderloin is a cut of meat you can knock out of the park if you know how to prepare it.  I promise this can happen in your kitchen, and you'll be amazed by the simplicity.  I adore this method for dinner parties or cooking for other people simply because it goes in the oven and stays there until it's finished.  No sauces to prepare, no fancy fillings - just meat, butter, salt, and pepper.  Can it get any easier?

Perfect Beef Tenderloin
chefjennylyn.com

2-lb. beef tenderloin, trimmed
2 tbsp. butter, softened
2-3 tsp. kosher salt
1/2 tsp. freshly ground black pepper

Preheat oven to 425 degrees.
Rub butter all over beef, and sprinkle with salt and pepper.
Bake 25-35 minutes or until a meat thermometer inserted in thickest portion reads 135 degrees (medium rare).  Cover loosely with aluminum foil, and let stand 15 minutes before slicing.


This is a 2-pound tenderloin inside the Medium Bar Pan to show you how perfectly it fits.  It's like this pan was made for delicious cuts of beef!  Here's a tip for the grocery store: Beef tenderloin is often sold in huge hunks that are 5-7 pounds.  Ask the butcher to cut off what you'd like.  Also, if you're shopping at a store without a butcher, they probably don't even carry tenderloin like this. (I'm looking at you, Super Target...)

Ok, my butter is melted in a 1-cup Prep Bowl, and salt is in a Pinch Bowl.  The pepper is in its fabulous Bamboo Grinder home, and everything is hanging out on a Cutting Board.  I wish I could say more, but this recipe is so simple that I'd just be rambling.  Get the styrofoam thingy out of the way, and slather that beef with those wonderful ingredients!


Ok, this is glorious.  Make sure you're using high quality pepper, or don't bother making this at all.  That is all the difference.  Hello, Pampered Pantry with the Peppercorn Medley that never disappoints!


Bake, and test.  Depending on the thickness of your tenderloin, it may take much longer than 30 minutes to cook.  I think this one may have been 45ish because it's simply huge.  All of those wonderful juices will mix with butter, salt, and pepper in the pan.  No one will judge you if you take a slice of the finished beef and rub it all in that deliciousness.  P.S. Your kitchen is going to smell amazing.  You're welcome.


Letting the beef stand a minimum of 15 minutes is a vital part of this recipe.  Do not skip it!  If you do, all of the juices will run out instead of setting up inside the beef.  Good-bye juiciness.  If you wait, however, this happens.  Gorgeous cuts of perfectly medium rare beef that you can serve the finest of guests.  I'm using the 8 1/4" Carving Knife from the Forged Cutlery Collection, and let me tell you it cut this thing like butter.  I did my cutting on the Large Grooved Cutting Board in case there was any run-off.  Once I was finished, I transferred it to the Bamboo Cheese Board and served with the Beaded Serving Spoon.  (Top pic)


Here's one more picture because I care.  In all seriousness, I would love for you to take this treasure of a recipe and make it happen!  You can change the recipe to fit any size tenderloin you want to use.  Just try this sometime soon, and be sure to let me know how it turns out!


Like the products used?
Shop Online 24/7 at pamperedchef.biz/jennylyn
E-mail me: chefjennylyn[at]gmail.com
Call me up: (205) 585-2464


Tuesday, July 29, 2014

Steakhouse Mushrooms


Let me be honest for just a second.  I don't know if I should be proud that I found this recipe or horrified that I enjoy it so much.  I'll just share it and let you be the judge.  Moving on...

Ok, so these were called Italian mushrooms in the magazine I tore them from years ago, but I changed the name to steakhouse mushrooms because I'm classy.  Honestly, they make me think of something I'd get in a nice restaurant, and they pair beautifully with beef.  Make these, and you won't be sorry.  Make them for friends, and you'll be a hero.

Steakhouse Mushrooms
chefjennylyn.com

1 lb. medium fresh mushrooms
1 large onion, sliced
1/2 cup butter, melted (That's a whole stick, folks.)
1 envelope Italian salad dressing mix

In a medium pot, layer mushrooms and onion.  Combine butter and salad dressing mix; pour over vegetables.  Cover, and cook on low 4-5 hours or until vegetables are tender.  Serve with a slotted spoon. 
(You can also use a slow cooker for this recipe.)


The short ingredient list makes these ideal for those meals you need to take other people.  They've become part of my "You had a baby, so I'll cook for you" rotation because of this and the fact that I don't have to stir constantly, etc.  Here, mushrooms are draining in a Stainless Mesh Colander, and butter is in a 2-Cup Prep Bowl.  As always, my ingredients are resting on the Large Grooved Cutting Board, grooved side down.  I've got the 5" Santoku Knife and Small Mix 'n Scraper ready to go, and the 4-Qt. Stockpot from the Executive Cookware Collection is standing by.


Slicing onions is so simple and easy with the Forged Cutlery Collection.  My method is always to slice top to bottom, cut off the ends, keeping the fuzz, and then make slices.  Cut off the fuzz, and you've got perfectly sliced onions you didn't have to chase all over the cutting board.


Butter is melted in the 2-Cup Prep Bowl and whisked using a Stainless Mini-Whisk.  Have I ever told you how much I adore the Stainless Mini Whisk?  It's a wonderful, wonderful tool that fits all of my small bowls.  Look at those beautifully layered veggies in the pot!  For a brief moment, they'll have you thinking you're about to cook a deliciously healthy side dish.

 
Then this happens.  But seriously, you're serving these with a slotted spoon, so most of that butter gets left in the pan.  Don't be scared.  If you're looking for something simple, comforting, and sure to make your house smell amazing, get these mushrooms going right now.  Let me know how they turn out!
 
 
Like the products used?
Shop Online 24/7 at pamperedchef.biz/jennylyn
E-mail me: chefjennylyn[at]gmail.com
Call me up: (205) 585-2464


Monday, July 28, 2014

Garlicky Grilled Shrimp


One day my husband mentioned that he thought grilled shrimp at home could be pretty good.  Even though I'd never done it before, I figured I'd just do what I always do when trying something new: Find a recipe that looks good, and follow the directions.  You know what?  It worked.  By the time I made these for the third time in just a couple of months, I decided I needed to take pictures and share the love.  Enjoy garlicky grilled shrimp, friends!  (Note: This recipe was in Food & Wine, but I tweaked it tremendously based on what I had available at the time. I like my version just fine.)

Garlicky Grilled Shrimp
chefjennylyn.com

1 tbsp. extra-virgin olive oil
1/4 cup minced onion
8 garlic cloves, minced
3 tbsp. chicken broth
1 tbsp. lemon juice
2 tbsp. chopped parsley
1 lb. large shrimp, shelled and deveined
Kosher salt and pepper
2 tbsp. unsalted butter, melted

Mix oil, onion, garlic, broth, lemon juice, and parsley.  Season the shrimp with salt and pepper.  Add everything together, and let stand for 15 minutes.  (This is a great time to pre-heat the grill.)

Thread the shrimp on 4 skewers, and rub the butter all over the shrimp.  Grill the shrimp over moderate heat, basting with the marinade and turning, just until cooked through, about 7 minutes.


I may not have a green thumb, but I can sure grow some parsley.  I now use my Professional Shears to cut herbs instead of tearing my plants up trying to do it by hand.


So I may have more than two tablespoons of parsley here... Anyway, all of my ingredients are out on the Large Grooved Cutting Board, grooved side down.  My broth is in an Easy Read Mini-Measuring Cup.  When it came to this recipe, I only measured the broth and oil.  Everything else, I kind of just threw in there because this is impossible to mess up.


After cleaning and halving my onions, I put those in the Manual Food Processor with the Parsley.  Get ready to see what I mean when I say this thing will do herbs.


Hello, beautiful mixture of onions and parsley.  You should smell my kitchen right now, by the way.


You've never seen me use the Garlic Peeler on here!  Put your garlic in, give it a roll with the palm of your hand, and get ready for the peel to pop right off.  This is especially handy when you want sliced garlic for a pizza or something.


Add the garlic, lemon juice, and olive oil to the Manual Food Processor.  I'm using the Citrus Press for the lemon, by the way.  No seeds in my marinade!


Give the mixture a few pumps, and there you have it.


To skewer shrimp, go through the meaty bottom and then the meat just before the tail.  These are the BBQ Skewers, of course.  Guess what?  These won't be available after August, so you need to get yours while you can!  Get ready to see why the Large Grooved Cutting Board is perfect for shrimp skewers to rest.


See all of that juicy marinade?  The wells will just catch the run-off!  By the way, my particularly astute readers may notice that I forgot to toss the shrimp in the marinade before skewering.  No problem!  Just glop it on the shrimp, turn them, hit the other sides, and let them rest fifteen minutes.  Whatever you do, don't unskewer everything over something that's no big deal.


I used BBQ Corn & Skewer Rack for these, which was a huge help.  It's nice to have the delicate shrimp off of the grill grates, especially to keep that garlic mixture intact.  Ok, after cooking a while, they'll start turning pink.  Let them keep going until you see a bit of char on some of the tails.


And here you go!  Beautiful shrimp that are worthy of a restaurant menu.  Seriously, these are absolutely delicious, and I think they should be part of your summertime dinner plan.  Enjoy!


Like the products used?
Shop Online 24/7 at pamperedchef.biz/jennylyn
E-mail me: chefjennylyn[at]gmail.com
Call me up: (205) 585-2464


Friday, June 6, 2014

Mango Salsa / Dressing / Chutney


This is one of those times I just want to go nutso and say ALL THE THINGS at one time!!!  This is such a great recipe that I want everyone to know about it right. now.  Deep breath...

Last weekend I had the opportunity to help teach a paleo cooking class with my friend Adam, a personal trainer and health coach.  He had several clients who were coming in to learn recipes and leave with food for a week of healthy meals.  My role was to provide the kitchen tools and help everyone use them.  (A fun afternoon with great people making awesome food and showing Pampered Chef products?  Sign me up!)  Anyway, we got to this mango dish, and the uses were being explained - eat as a side, put on top of steak, etc. - and all I could think was, This would be great with pita chips!  Now, I may not know much, but I do know that yelling out about pita chips at a paleo cooking class is a pretty good way to never be invited back.  I held my tongue, but I knew these ingredients would end up on my shopping list for the week along with... pita chips.

Get ready for what I think might be the best summer salsa I've ever had in my life!
 
Mango Salsa / Dressing / Chutney
chefjennylyn.com

1 large mango, cubed
1/2 small red onion, diced
1 bunch cilantro, chopped
1 avocado, cubed
1 cucumber, diced
2 cloves garlic, minced
1 lime, juiced
1 tbsp. olive oil
1/2 tsp. sea salt
Juice of one orange if doing chutney

Salsa: Combine all ingredients, mixing to incorporate.  Serve immediately

Dressing: Smash the ingredients, and add more olive oil

Chutney: Heat ingredients to simmer, and add juice of 1 orange.  Shake in a few pepper flakes if desired.


Do the bright colors of the ingredients make you happy?  They do me!  Cilantro is draining in a Stainless Mesh Colander, and olive oil is measured into the Mini Easy Read Measuring Cup.  My produce is on the Large Grooved Cutting Board with the flat side up, and I've got the Bamboo Grinder Set standing by for the sea salt at the end.  Then I have my Manual Food Processor, a Bamboo Specialty Tool, my Avocado Peeler, and my Mango Wedger.  This is going to be fun!


The great thing about the Manual Food Processor is that you can do multiple ingredients at the same time.  Red onion and cilantro: BEFORE.


Red onion and cilantro: AFTER.  Just a few quick pumps, and I'm done chopping herbs and onion.  On recipes where you need a bunch of an herb, this thing just can't be beaten.


I sliced my cucumber into chunks using my favorite knife, the 5" Santoku from the Forged Cutlery Collection, and now I'll finish the job with the Manual Food Processor.


Have I mentioned that I use this tool all the time?


The recipe calls for a large mango, but I don't like mango as a star ingredient.  I opted for the smaller size, but you can see that the Mango Wedger can fit all types.  This really is one of the most amazing tools I've ever seen.  The thing just finds the pit, cuts around it, and reduces waste.  Awesome!


To finish the job, score the mango two ways, and then just cut it right off of the peel.


I use the Avocado Peeler constantly during the summer.  I love avocado on salads, but I also have a thing with fresh guacamole.  By a thing, I mean an addiction.  Anyway, I think this is the best tool ever because it goes through the skin of the fruit without being sharp.  Read: You won't cut yourself.


Score the avocado two ways, making squares, and pop it out of the peel.  Here's a tip for when you only use half at a time.  Save the remaining half with the nut still inside, and cover it with plastic wrap that actually touches the green side.  That prevents air from getting against the meat, which keeps it from turning brown.


The Garlic Press!  You don't have to peel the garlic, people.  Fresh garlic changes everything, so get a garlic press and start taking advantage of the most inexpensive ingredient ever.  Everything here is in a Stainless Mixing Bowl, by the way.


I can't say enough about the Citrus Press, but this was mentioned in an awesome article I read recently on tools chefs can't live without.  This maximizes the juice you get out of citrus without letting seeds into your dish.  When one small lime is $.69, I want all the juice.


This is a great thing to have as a snack, take to a party, or make your kitchen smell fresh and delicious.  Whatever.  Just trust me when I say it's a winner.  Please, please, please make it sooner than later!  Ok, I'm going to stop before I say too much.  Just... please?


Like the products used?
Shop Online 24/7 at pamperedchef.biz/jennylyn
E-mail me: chefjennylyn[at]gmail.com
Call me up: (205) 585-2464


Thursday, May 29, 2014

Grilled Steak Kabobs


Do you remember a couple of posts ago when I made chicken kabobs?  Do you remember how it was mid-April, and my plan was derailed by a snowstorm?  Yeah, I do, too.  Anyway, my husband and I had our FPU friends over for a second "Family Dinner" last night, and we served a new kabob recipe - one that turned out to be amazing!  Guess what?  We even got to cook them outside this time!  Buckle up, my sweeties.  You're going to want steak kabobs tonight.

Grilled Steak Kabobs
chefjennylyn.com

2 tsp. salt
2 tsp. sugar
2-3 lemons, trimmed and sliced into rounds
2/3 cup extra virgin olive oil
1/4 cup grainy mustard
2 tbsp. balsamic vinegar
2 1/4 lb. sirloin steak, but into 1-inch cubes
2 pints grape or cherry tomatoes
8 scallions, white portions only, cut into 1-inch pieces

In a small bowl, mix salt and sugar.  Toss with lemon slices, and let stand one hour.

In a large bowl, whisk together olive oil, mustard, and vinegar.  Transfer one-third of the marinade to a medium bowl.  Marinate beef in remaining marinade, and add tomatoes and scallions to the medium bowl.  Refrigerate for at least one hour.

Thread eight skewers using this pattern:
Beef cube - lemon slice - tomato - beef cube - scallion piece - tomato.

Season kabobs with extra salt and pepper if desired, and grill on medium-high heat for 8-10 minutes, turning occasionally.  (This cooking time is for medium-rare.)

Note: I used a Rachael Ray recipe that I tore out of a magazine a few years ago.  The recipe above is hers doubled with a few tweaks.  She didn't pay me to make her stuff, but that'd be sweet.


Let's start with something very important.  My in-laws grew these green onions.  That means this recipe is made with an extra dose of love, one you won't find just anywhere.  (I married well, right?)

I'm one for getting everything out at the same time.  The ingredients, the tools, everything.  This prevents fumbling around and wasting valuable minutes.  I've got Batter bowls, a Measure-All Cup, a Pinch Bowl, the Stainless Whisk, the Small Mix 'n Scraper, and a Large Cutting Board out and ready to go.


What makes the Measuring Spoon Set so awesome?  Besides the classic design that won't go out of style, the fact that they snap together for easy storage, and the standard and metric measurements, I'd say the way they fit inside spice bottles.  These small conveniences make a big difference when you're in the nitty-gritty of cooking and baking.


Having good knives in your kitchen is important, especially when you want to get solid, uniform slices of lemon.  The Forged Cutlery Collection will blow your mind!  This is the 5" Santoku, my favorite piece.


Meaure-All Cup!  I've shown this many times, but you press it down to the measurement you want, fill it with whatever is gross or inconvenient to measure (mustard, mayonnaise, peanut butter, honey, etc.), and pop it out.  There's no mess, and you're guaranteed to get every bit of the ingredient out of the cup.  I'm measuring into the Classic Batter Bowl, and my oil and vinegar are hanging out in Easy Read Measuring Cups.


I love kabobs.  I love grilling season.  I love the slicing and dicing and the bright, beautiful colors.  Are you with me?


My lemons and beef are in Stainless Mixing Bowls, and I have tomatoes and scallions in the Classic Batter Bowl.  The Small Mix 'n Scraper is being used to toss everything.


Skewering kabobs takes patience, but it's pretty fun if you have the right playlist, beautiful vegetables, and the Pampered Chef BBQ Skewer Set.  Seriously, these things are amazing!  They have tips pointed just enough to aid in stabbing but not so sharp that people are going to get hurt eating dinner.  The stainless steel means heat throughout the meat, resulting in a faster cooking time.  Then there's the sheer length for adult portions.  Honest moment: I don't want a six-inch kabob.


I'm using the BBQ Corn & Skewer Rack, and that's the BBQ Grill Tray underneath.  I know it's weird, but the tray was already on the grill from peppers, and I figured it wouldn't hurt anything to just set the rack on top.  I was right.  And the BBQ Tongs?  Amazing.  (One note: You may see that I did a couple of kabobs with onions.  That's because I ran out of lemons and improvised.)


What a wonderful night with friends!  Kabobs, Take 2 = Success!


Like the products used?
Shop Online 24/7 at pamperedchef.biz/jennylyn
E-mail me: chefjennylyn[at]gmail.com
Call me up: (205) 585-2464