Showing posts with label Appetizer. Show all posts

Sunday, September 7, 2014

My Favorite Guacamole


I'm super excited to share my favorite guacamole recipe ever.  That is all.

(The above picture shows this served in a Small Bamboo Bowl on the Bamboo Cracker Tray with sweet potato chips I made using the Ultimate Mandoline and the Microwave Chip Maker.  That method will be in another post sometime.)

My Favorite Guacamole
chefjennylyn.com

2 ripe avocados, mashed
4 small tomatoes or a handful of grape tomatoes, diced
1/2 of 1 large jalapeno, seeded and chopped
1/2 cup cilantro, chopped
1/2 cup green onions, chopped
2 tbsp. fresh lime juice
1/2 tsp. hot sauce
Salt, to taste

So the directions here are pretty simple.  Mix everything together, and enjoy.


The best tip I can ever give anyone interested in cooking at home more often is to get everything out at the same time.  It's frustrating to work through a recipe and pull ingredients right when you need them.  For one, you can forget things that way, and two, it just makes cooking kind of willy-nilly.  By getting everything out at once, you can streamline the part where you actually put the recipe together.

Above, I have my Measuring Spoon Set, a 1-Cup Measure-All Cup, my Manual Food Processor, my Bamboo Salt and Grinder Set, the Herb Keeper, Professional Shears, a Stainless Mixing Bowl, the Mix 'n Chop, a Citrus Press, two Forged Knives, a Mix 'n Scraper, the Avocado Peeler, and my trusty Large Cutting Board.  Let's do this.


All I can tell you about working with jalapenos is that you should wear gloves.  I learned the hard way to never, ever dig seeds out with your bare fingers, but today I also learned that cradling a hot pepper in your hand can lead to a delayed burning sensation on that tender skin between your thumb and pointer finger.  Don't be a hero.  Wear gloves.  Anyway, you definitely want to remove the seeds, and a spoon is perfect for doing so.  I sliced this pepper with the 5" Santoku Knife from the Forged Cutlery Collection.


The 4 1/2" Serrated Knife from the Forged Cutlery Collection is the ultimate for slicing tomatoes.  It breaks through the skin without smashing the... fruit?... vegetable?... Eh, whatever.


When I have multiple ingredients that need to be chopped, I throw them all in the Manual Food Processor together.  The cilantro, jalapeno, and green onions have all been swirled together to create a family of green awesomeness.  Note: I cut the pepper and onions into chunks before putting them in the processor.


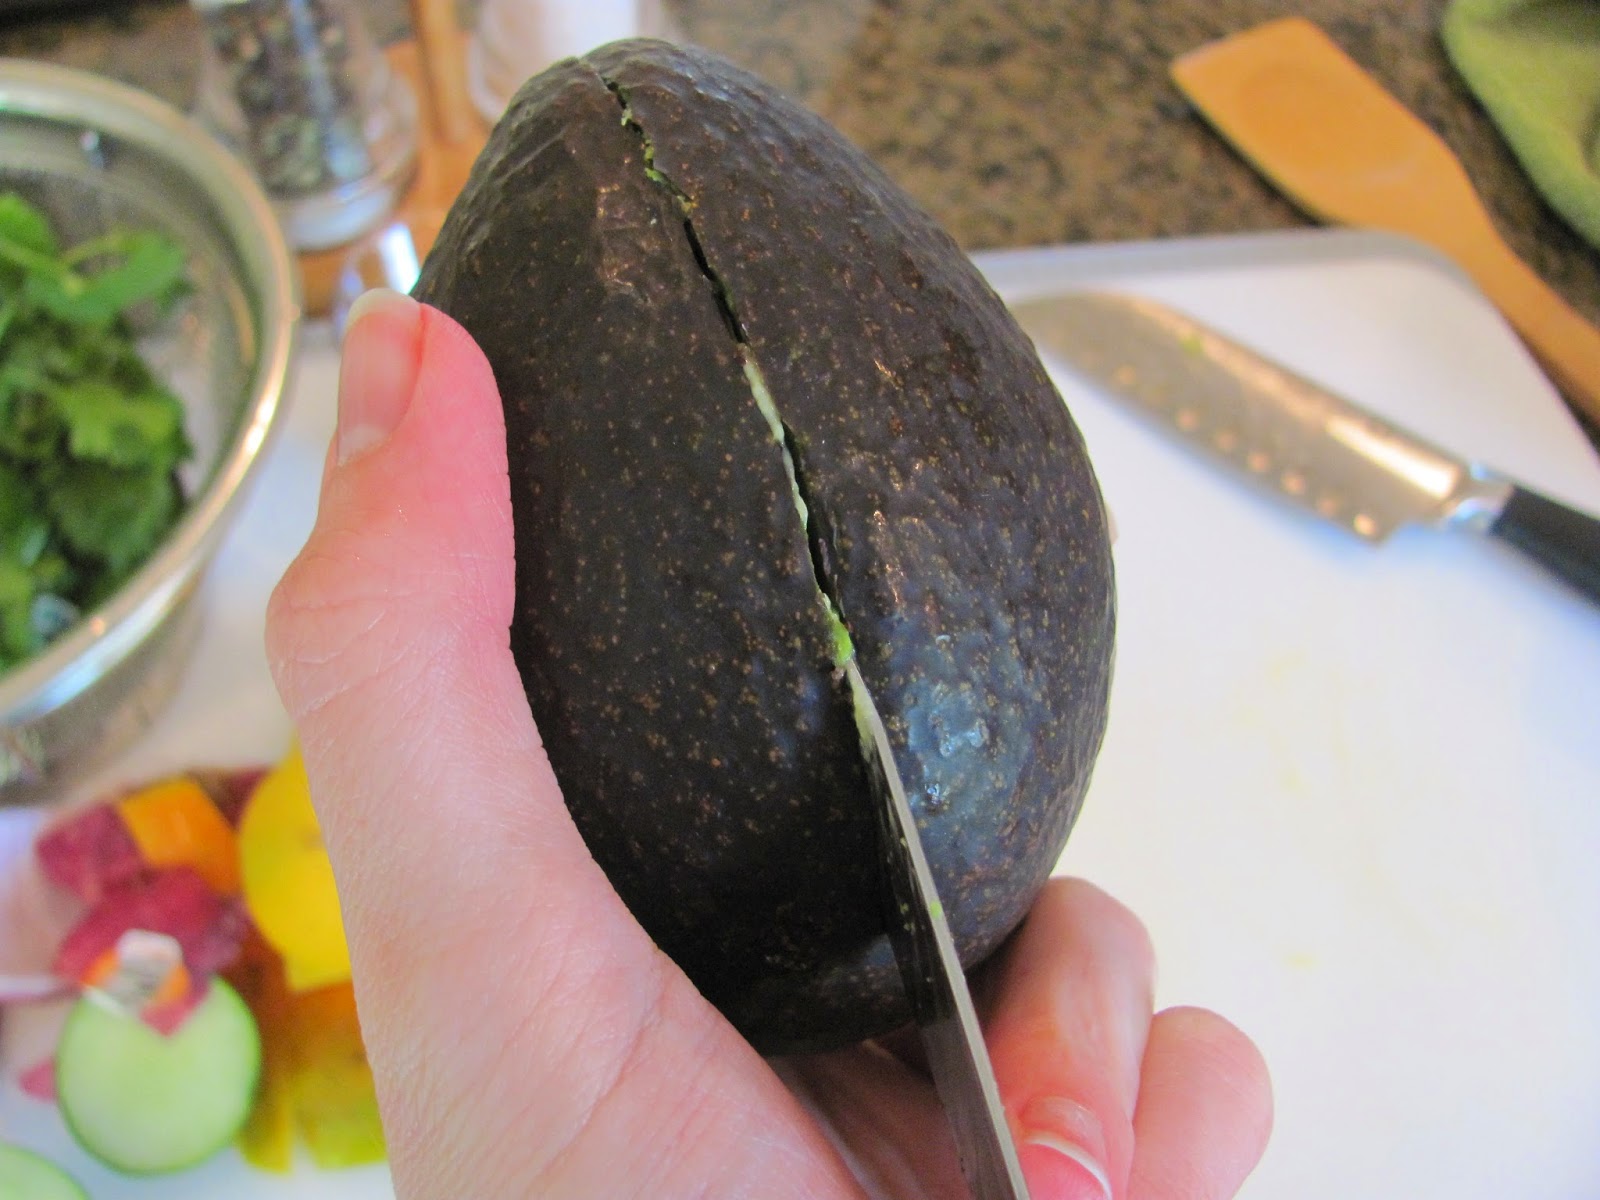
I'm kind of shocked by the number of people who are intimidated by avocados.  First of all, let's talk about how to choose a ripe one.  It should give a little when you squeeze it, but it shouldn't be mushy.  If it feels like mush, you might have a mess inside.  If it feels as hard as a rock, give it a couple of days to turn to perfection.  Ok, for peeling, you just stick the Avocado Peeler in the side and let the large pit guide you all the way around.  Then you separate the two sides, and you end up with what you see below.  Scroll for the next step.


Remove the pit, and simply outline the meat, popping it out of the peel.  Done!  (If you want slices or cubes, just cut them while still inside the peel, and then pop them out.)


Mash the avocado with the Mix 'n Chop, and add everything else.  Here, I'm squeezing my lime juice with the Citrus Press.  You know what?  I've seen the Citrus Press featured in "Stuff chefs can't live without" type articles in three major food magazines over the last few months.  Get a Citrus Press, people!  Moving on... Isn't this looking beautiful now?


I'm using my favorite Stainless Mixing Bowl, the Mix 'n Scraper, and a Bamboo Grinder full of Pampered Pantry Himalayan Sea Salt.  The bowl is big and wide to ensure ingredients get mixed, the scraper keeps from anything being left on the sides, and the high quality salt says, "This guacamole was made with l-o-v-e." From here, taste, add more salt or lime juice if needed, and call it a day.  Your guacamole is ready to be enjoyed! 


One last picture and a tip for storage.  Put a pit inside, and cover the avocado with plastic that actually touches it.  Then cover your container with its lid.  This will maximize the time you have before your guacamole turns brown.

I'll let you know how things go over these next few weeks.  For now, let's all just enjoy guacamole deliciousness!


Like the products used?
Shop Online 24/7 at pamperedchef.biz/jennylyn
E-mail me: chefjennylyn[at]gmail.com
Call me up: (205) 585-2464


Friday, June 6, 2014

Mango Salsa / Dressing / Chutney


This is one of those times I just want to go nutso and say ALL THE THINGS at one time!!!  This is such a great recipe that I want everyone to know about it right. now.  Deep breath...

Last weekend I had the opportunity to help teach a paleo cooking class with my friend Adam, a personal trainer and health coach.  He had several clients who were coming in to learn recipes and leave with food for a week of healthy meals.  My role was to provide the kitchen tools and help everyone use them.  (A fun afternoon with great people making awesome food and showing Pampered Chef products?  Sign me up!)  Anyway, we got to this mango dish, and the uses were being explained - eat as a side, put on top of steak, etc. - and all I could think was, This would be great with pita chips!  Now, I may not know much, but I do know that yelling out about pita chips at a paleo cooking class is a pretty good way to never be invited back.  I held my tongue, but I knew these ingredients would end up on my shopping list for the week along with... pita chips.

Get ready for what I think might be the best summer salsa I've ever had in my life!
 
Mango Salsa / Dressing / Chutney
chefjennylyn.com

1 large mango, cubed
1/2 small red onion, diced
1 bunch cilantro, chopped
1 avocado, cubed
1 cucumber, diced
2 cloves garlic, minced
1 lime, juiced
1 tbsp. olive oil
1/2 tsp. sea salt
Juice of one orange if doing chutney

Salsa: Combine all ingredients, mixing to incorporate.  Serve immediately

Dressing: Smash the ingredients, and add more olive oil

Chutney: Heat ingredients to simmer, and add juice of 1 orange.  Shake in a few pepper flakes if desired.


Do the bright colors of the ingredients make you happy?  They do me!  Cilantro is draining in a Stainless Mesh Colander, and olive oil is measured into the Mini Easy Read Measuring Cup.  My produce is on the Large Grooved Cutting Board with the flat side up, and I've got the Bamboo Grinder Set standing by for the sea salt at the end.  Then I have my Manual Food Processor, a Bamboo Specialty Tool, my Avocado Peeler, and my Mango Wedger.  This is going to be fun!


The great thing about the Manual Food Processor is that you can do multiple ingredients at the same time.  Red onion and cilantro: BEFORE.


Red onion and cilantro: AFTER.  Just a few quick pumps, and I'm done chopping herbs and onion.  On recipes where you need a bunch of an herb, this thing just can't be beaten.


I sliced my cucumber into chunks using my favorite knife, the 5" Santoku from the Forged Cutlery Collection, and now I'll finish the job with the Manual Food Processor.


Have I mentioned that I use this tool all the time?


The recipe calls for a large mango, but I don't like mango as a star ingredient.  I opted for the smaller size, but you can see that the Mango Wedger can fit all types.  This really is one of the most amazing tools I've ever seen.  The thing just finds the pit, cuts around it, and reduces waste.  Awesome!


To finish the job, score the mango two ways, and then just cut it right off of the peel.


I use the Avocado Peeler constantly during the summer.  I love avocado on salads, but I also have a thing with fresh guacamole.  By a thing, I mean an addiction.  Anyway, I think this is the best tool ever because it goes through the skin of the fruit without being sharp.  Read: You won't cut yourself.


Score the avocado two ways, making squares, and pop it out of the peel.  Here's a tip for when you only use half at a time.  Save the remaining half with the nut still inside, and cover it with plastic wrap that actually touches the green side.  That prevents air from getting against the meat, which keeps it from turning brown.


The Garlic Press!  You don't have to peel the garlic, people.  Fresh garlic changes everything, so get a garlic press and start taking advantage of the most inexpensive ingredient ever.  Everything here is in a Stainless Mixing Bowl, by the way.


I can't say enough about the Citrus Press, but this was mentioned in an awesome article I read recently on tools chefs can't live without.  This maximizes the juice you get out of citrus without letting seeds into your dish.  When one small lime is $.69, I want all the juice.


This is a great thing to have as a snack, take to a party, or make your kitchen smell fresh and delicious.  Whatever.  Just trust me when I say it's a winner.  Please, please, please make it sooner than later!  Ok, I'm going to stop before I say too much.  Just... please?


Like the products used?
Shop Online 24/7 at pamperedchef.biz/jennylyn
E-mail me: chefjennylyn[at]gmail.com
Call me up: (205) 585-2464


Tuesday, February 18, 2014

Creamy Bacon Dip


Take in this top picture, and make a mental note that bacon and green onions on top of a warm, creamy dip should happen in your kitchen soon.  You're welcome.

My husband and I had friends over for a staycation Friday and Saturday, which is just a way of saying we had an adult slumber party.  This was a two-day event, meaning we needed lots of food - "bad for you" food!  This dip had been in my to-do binder, and I had a feeling it would be the perfect appetizer to serve between brunch and lunch.  Turns out, I was right!  With everyone's hearty approval, creamy bacon dip has earned its place as a keeper.  It had us all at bacon.

Creamy Bacon Dip
chefjennylyn.com

8 oz. cream cheese, soft
2 cups sour cream
3 oz. bacon, cooked and crumbled
2 cups cheddar, shredded
1 cup green onion, chopped
Extra bacon and onions for garnish

Preheat oven to 400 degrees.
Mix all ingredients, and place them in a 1-qt. dish.  Cover, and bake 25-30 minutes.


Bacon on stoneware?  Absolutely.  For just a few pieces, I use the Medium Bar Pan, but I go with the Large when I'm cooking more.  Heat the oven to 415 degrees, and cook the bacon 20-30 minutes or until you're desired degree of doneness.  I like mine thick and crispy, so I'm more 35-40 minutes. 


Don't you love simple recipes?  There are just a few ingredients to mix together, and you're done.  Sure, you need to cook the bacon and chop the onions, but those are simple tasks that can even be done ahead of time.  In this picture, cheese and sour cream are in a Stainless Mixing Bowl, and more sour cream is in the Measure-All Cup.  Then I've got cream cheese in the Classic Batter Bowl and onions on the Large Cutting Board with a 1-Cup Prep Bowl ready to receive.  The Round Covered Baker is in the back for the actual baking part.


Produce is pretty, especially when the light is good.


Bacon is also pretty nice, especially when you know you're about to eat it.  I used my 5" Santoku Knife from the Forged Cutlery Collection for all the slicing and dicing in this recipe.  Side note: You might want to cook an extra piece or two of bacon for nibbling.  Just a thought...


Pop the sour cream out of the Measure-All Cup, and you're ready to go!  To be perfectly honest, I think I'd cut the sour cream by 1/4 or 1/2 cup next time around.  Two cups just seems like a lot, and it's slightly overpowering.  Given that I got this recipe from a sour cream company's magazine ad, I can see why there's so much.  (Sorry, I can't remember which brand, but I'm leaning towards Daisy.)


After mixing everything really well with a Mix 'n Scraper, I put it in the Round Covered Baker because the dip is actually supposed to bake covered.  This is a great piece from the Stoneware Collection because you can do so much with it: bake chicken, microwave a delicious risotto, and more.  To finish the dip, bake it, top it with garnish, and serve to friends!  Oh, and get ready to share the recipe!  Enjoy!


Like the products you saw used?
Shop Online 24/7 at pamperedchef.biz/jennylyn
E-mail me: chefjennylyn[at]gmail.com
Call me up: (205) 585-2464


Wednesday, March 28, 2012

Greek Pinwheels

I want to kiss the inventor of puff pastry, and I don't mean one of those polite little kisses some cultures use as a greeting. Is there anything puff pastry can't do? It's so versatile in that it can be used for all types of recipes, but it also - get this - puffs! How fun is that? And the buttery goodness that coats your mouth when you take a bite... I just love it. There's just one thing that sometimes throws me about puff pastry, and I'm going to be honest here: 2 sheets per box when I only want 1 for a recipe. Some people love keeping spare ingredients on hand, but I'm not those people. No, I'm the person who forgets something is around and then lets it go bad before it gets used. Given that puff pastry isn't cheap, I don't want it succumbing to frost bite because I failed to find a use for it. Welcome to the reason I tried this recipe.

Greek Pinwheels
chefjennylyn.com

1 sheet frozen puff pastry, thawed
1 tbsp. beaten egg
3/4 tsp. water
1/2 cup cream cheese, softened
1/3 cup marinated artichoke hearts, drained and finely chopped
1/4 cup feta cheese, crumbled
1 tbsp. oil-packed sun-dried tomatoes, drained and finely chopped
1 tsp. Greek seasoning

Preheat oven to 425 degrees.

Unfold puff pastry. Whisk egg and water; brush over pastry.
Combine and mix remaining ingredients, and spread over pastry to within 1/2 inch of edges. Roll up jelly-roll style, and cut into twenty 1/2-inch slices.

Place 2 inches apart on stones, and bake 10-12 minutes or until puffed and golden brown. Serve warm.

We have a ton of spices, but the Greek Rub may be my favorite. Use it on meat, vegetables, etc., and thank me later. Seasoning is in a Measuring Spoon while feta hangs out in a Measuring Cup. Then I've also got the Easy Opener to pop the seal on my artichoke hearts. All these gems are resting on a Cutting Board.

Have I ever told you how much I adore the Manual Food Processor? Just stick your ingredients inside, and pump the top until they're chopped to your liking. Love.

Sorry, but this is where the pictures end. What can I say? I just wasn't in the mood to wash my hands and use my camera. Instead, I stayed covered in egg, Greek mixture, and puff pastry, assuming all my friends could use their imaginations to picture what it looks like to fill, slice, and bake pinwheels. In all seriousness, I got really messy, and I don't know how. I think once you get slimy things on your fingers, it's all downhill, and all bets are off. That's what happened here, but the end result was still fabulous. Egg: 1-Cup Prep Bowl. Water: Measuring Spoon. Also pictured: Stainless Mini Whisk and Large Grooved Cutting Board.

So you've been looking for new appetizers for those spring parties you've got coming up? All together now: "Problem solved."

Like the products you saw used?
Shop Online 24/7 at pamperedchef.biz/jennylyn
E-mail me: chefjennylyn[at]gmail.com
Call me up: (205) 585-2464


Wednesday, November 9, 2011

Spinach, Artichoke, and White Bean Dip

I don't think you can have too many dip recipes. This is especially true when it comes to the time of the year you spend bouncing from party to party, appetizer plate to appetizer plate, cocktail glass to cocktail glass, calorie. to. calorie. That's why I clipped this recipe from a recent issue of Cooking Light, my favorite magazine for food that tastes great without expanding my waistline. I'm not saying this is a perfect substitution for typical spinach and artichoke dip, but I am saying you can nosh on it while still fitting in those cocktail dresses you're depending on to get you through the party season.

(Displayed in Mini Baker from the Stoneware Collection)


Spinach, Artichoke, and White Bean Dip
chefjennylyn.com

1/4 cup (1 ounce) grated fresh pecorino Romano cheese
1/4 cup canola mayonnaise
1 teaspoon fresh lemon juice
1/4 teaspoon salt
1/4 teaspoon freshly ground black pepper
1/8 teaspoon ground red pepper
2 garlic cloves, minced
1 (15-ounce) can white beans, rinsed and drained
1 (14-ounce) can baby artichoke hearts, drained and quartered
1 (9-ounce) package frozen chopped spinach, thawed, and squeezed dry
1/2 cup (2 ounces) shredded part-skim mozzarella cheese


1. Preheat oven to 350°

2. Place Romano cheese, 1/4 cup mayonnaise, 1 teaspoon lemon juice, salt, black pepper, red pepper, minced garlic, and white beans in a food processor, and process until smooth. Spoon into a medium bowl. Stir in the artichokes and spinach. Spoon the mixture into a prepared baking dish, and sprinkle with 1/2 cup mozzarella.

3. Bake at 350° for 20 minutes or until bubbly and brown


This recipe seems pretty straightforward from the directions, but there's actually a lot going on. Start by organizing your spices into a Pinch Bowl, and get that Garlic Press pressing. No peeling the garlic! Here I'm using my Measuring Spoons and the Bamboo Pepper Grinder full of Pampered Pantry Peppercorn Medley.

Frozen spinach annoys me, but it's a lot less annoying when I take care of it with a Stainless Mesh Colander. The mesh in here is fine enough to keep the spinach from getting all over the sink. The rundown here includes the Measure-All Cup for mayonnaise and all other sticky, gross, don't-want-to-touch-that things, the Can Strainer, a 3 1/2" Paring Knife from the Forged Cutlery Collection, Measuring Cups, and the Large Cutting Board.

Can I just say Smooth-Edge Can Opener for the win? Take a look at how this removes the entire lid from the top of the can... no sharp edges, no mess, no lid getting inside the beans... perfection.

The Microplane Adjustable Coarse Grater is the answer to shredded cheese of any kind. By grating your own cheese, you save a lot of money, and you don't have to worry about all that powdery stuff pre-shredded cheese contains to keep it from sticking together.

Artichokes go in the Manual Food Processor for quick chopping before being added to the Classic Batter Bowl where everything's coming together. Did you know the batter bowls go in the oven?

Artichokes, spinach, white bean concoction after being processed. Stir this with the Mix 'n Scraper, top it with cheese, and you're good to go!

The Mini Baker from the Stoneware Collection is the perfect size for this and other dip recipes, and it makes a beautiful presentation right out of the oven.

Enjoy all the parties you're about to hit without the "how much am I gaining?" mentality. Eat what you want, but have small portions. Substitute low-cal items such as this dip when possible, and avoid hanging out near the buffet. Nothing you don't already know, but put it into practice this year. I'll try to do the same.

Like the products you saw used?
Shop Online 24/7 at pamperedchef.biz/jennylyn
E-mail me: chefjennylyn[at]gmail.com
Call me up: (205) 585-2464


Wednesday, October 19, 2011

Grilled Stuffed Jalapeños

It's football season, and that means football food. These grilled stuffed jalapeños will do two things for you: 1) Make you wish you'd seen this recipe sooner and 2) Lead your team to victory. At least that's the case if you're an Alabama fan in 2011. I made these; my team won. Correlation? My dad and I threw these on the grill a few weeks ago, and we were thrilled with the result. Seriously, these are good.

Grilled Stuffed Jalapeños
chefjennylyn.com

2 slices center-cut bacon
1/2 cup (4 ounces) cream cheese, softened
1/2 cup (4 ounces) fat-free cream cheese, softened
1/4 cup (1 ounce) shredded extra-sharp cheddar cheese
1/4 cup minced green onions
1 teaspoon fresh lime juice
1/4 teaspoon kosher salt
1 small garlic clove, minced
14 jalapeño peppers, halved lengthwise and seeded (GLOVES!!!)
2 tablespoons chopped fresh cilantro
2 tablespoons chopped seeded tomato
Cooking spray


1. Preheat grill to medium-high heat.

2. Cook the bacon in a skillet over medium heat until crisp. Remove bacon from pan, and drain on paper towels. Crumble bacon. Combine crumbled bacon, cheeses, and next 4 ingredients (through garlic) in a bowl, stirring to combine. Divide cheese evenly and fill the pepper halves.

3. Place peppers, cheese side up, on grill rack or grill grate coated with cooking spray. Cover and grill peppers 8 minutes or until bottoms of peppers are charred and cheese mixture is lightly browned.

4. Place the peppers on a serving platter. Sprinkle with cilantro and tomato.

There are a lot of jalapeños to slice and seed, so let me go ahead and warn you to wear gloves. Not a glove but gloves. It was because of my stubborn "oh, I can just wear one glove for getting the seeds out" attitude that led me to soak my left hand in milk a couple of hours later. Unless you enjoy burning pain under your fingernails, glove both your hands. Bad memories. Moving on! My whole peppers are in a Stainless Mesh Colander, and the seeds are in a 2-Cup Prep Bowl. The 5" Santoku from the Forged Cutlery Collection is laid out on the Large Grooved Cutting Board, and everything is over the sink to maximize counter space.

I love a simple recipe, especially when it leads to amazing appetizers. I'm using the Citrus Press, the Coarse Grater, the Garlic Press, the Measure-All Cup, and an Adjustable Measuring Spoon for my filling.

The Classic Batter Bowl is perfect for this mixture, and its clear sides let you see all the pretty colors through the bowl. You know, pretty like the color of bacon. Give this a good stir with the Mix 'n Scraper, and you'll be ready to fill the peppers in no time.

I used the scoop and spread method to fill the peppers: Small Scoop of filling and then spread later. Put them on the Grill Tray as you fill them, and get ready for magic.

Unless you have a brand new grill, it's difficult to make a grilling picture look pretty. Cover the Grill Tray with foil, and let these babies cook. The Grilling Tongs are helpful for checking the peppers, and they're long enough to keep your hands and arms away from the heat.

Roll Tide, and make peppers. Wear gloves.

Like the products you saw used?
Shop Online 24/7 at pamperedchef.biz/jennylyn
E-mail me: chefjennylyn[at]gmail.com
Call me up: (205) 585-2464


Thursday, October 6, 2011

Southern Cheese Straws

You know what's delicious? Food that contains a pound of cheddar cheese. In the South, cheese straws are a bit of a staple, and no one questions the ratio of cheese to flour. I'm convinced the only reason this recipe calls for any flour is simply to hold the cheese together, but that's part of its beauty. If you Google "cheese straws," you'll come up with countless recipes, and I don't know that any one is better than the others. I came across this one at Belle of the Kitchen, and I was convinced it was worth trying because they were the blog's author's grandfather's signature recipe. Did you get all that? If a recipe is worth passing through generations, it's a keeper.

I made these for one of my sister's wedding showers, and I was very pleased with the result. While my first attempt at cheese straws was more like cheese coins than the beautiful crackers in Belle's post, I figured it just gave me an excuse to try again soon! So here I'll share my adaptation on the original recipe, and you can decide what you'd like to do. Enjoy!


Southern Cheese Straws
chefjennylyn.com

1 pound New York extra sharp cheese
1 stick butter, softened
2 cups flour
3/4 teaspoon cayenne pepper (use a full teaspoon if you like them especially spicy)
dash of paprika

Preheat the oven to 350°. Grate the cheese. Then, using a food processor, mix the cheese and the butter. Add the flour, pepper and paprika a little at a time to the mixture and pulse until well combined and very soft.

Either place the dough in a metal cookie press fitted with a flat disk and squeeze onto an ungreased cookie sheet, or scoop small balls of dough onto sheet, flattening slightly.

Bake for 10-15 minutes, until they just start to darken. Sprinkle with kosher salt when they come out of the oven. If done with a cookie press, cut into pieces when they are still warm.


A pound of cheddar is no joking matter. Fortunately, I was using my Microplane Course Grater, which made quick work of the "shred cheese" step. I love that this tool adjusts, and it comes with a protective sleeve to spare my knuckles when I reach in kitchen drawers. When cooking, it's worth it to use block cheese because it doesn't contain the wax that keeps pre-shredded cheese from sticking to itself when packaged.

My cheese, etc. is on the Large Cutting Board, and the arsenal of tools is as follows: Cheese Knife, Adjustable Measuring Spoon, Dots Pasta Bowl, Measuring Cup Set, Microplane Coarse Grater, and Stainless Mixing Bowl. Things are about to get crazy.

I don't have a food processor, so every recipe that calls for one requires a second look before I can commit. In this case, I knew I could simply knead my dough by hand after doing what I could with a hand mixer. Welcome to a whole lot of cheese with a little bit of flour.

The Small Scoop is seriously the greatest thing ever. Just scoop out the dough, press it slightly with your hand, and you're set! I used the Large Bar Pan with Parchment Paper, and I also used a Cookie Sheet.

Before becoming the baked perfection that is a Southern cheese straw.

These were successful. They may not have been the correct shape, but the flavor was there, and I came out with a go-to recipe for the future. These are displayed on the Dots Oval Platter from the Simple Additions Collection, and they're perfectly complemented by a beautiful spread of shower food. Someone else want to have a bridal tea so I can try this again?

Like the products you saw used?
Shop Online 24/7 at pamperedchef.biz/jennylyn
E-mail me: chefjennylyn[at]gmail.com
Call me up: (205) 585-2464