Showing posts with label executive cookware. Show all posts

Monday, February 24, 2014

Mushroom Orzo


Finding a good side dish is a huge, huge score!  I served this orzo a couple of weeks ago, and I knew I needed make it again for the blog.  I mean, you've got the fun of orzo, the delicious flavor of portobello mushrooms, and the fancy touch of Romano cheese.  What's not to love?  The best part is that the flavors say weekend, but the simplicity says weeknight.

Mushroom Orzo
chefjennylyn.com

3/4 cup uncooked orzo
1 1/2 tablespoons butter
3 cups sliced cremini (portobello) mushrooms
1/2 tsp. black pepper
3/8 tsp. salt (Ok, I estimated because... 3/8?)
1/4 cup chicken broth
1 tablespoon white wine vinegar
1/4 cup minced chives
1 oz. Romano cheese (about 1/4 cup)

Cook pasta according to package directions, omitting salt and fat.

Melt butter in a large skillet over medium heat; cook 1 minute or until lightly browned. (This step is important.  Browning the butter lends a depth of flavor you'll miss if you rush.)  Add mushrooms, salt, and pepper.  Cook 4 minutes or until mushrooms release their liquid, stirring frequently.  (I cook mine longer.)

Add broth and vinegar; stir in orzo and chives.  Top with cheese.

* This recipe is from Cooking Light, my favorite food magazine, but I changed a couple of things.  The original calls for white balsamic vinegar, but I used what I already had, and it worked just fine.


Let me take a second to tell you how much you need the Bamboo Grinder Set.  These are the most attractive grinders I've ever seen, and they're backed by the quality of the Pampered Chef.  The best part is that you can actually see when you're running out of something instead of figuring it out while in the midst of four hot burners.  I measured all of my ingredients, and then I used the 3 1/2" Paring Knife from the Forged Cutlery Collection to slice my chives.  To finish, I scooped them with the cute little Scoop 'n Measure.  (See below.)
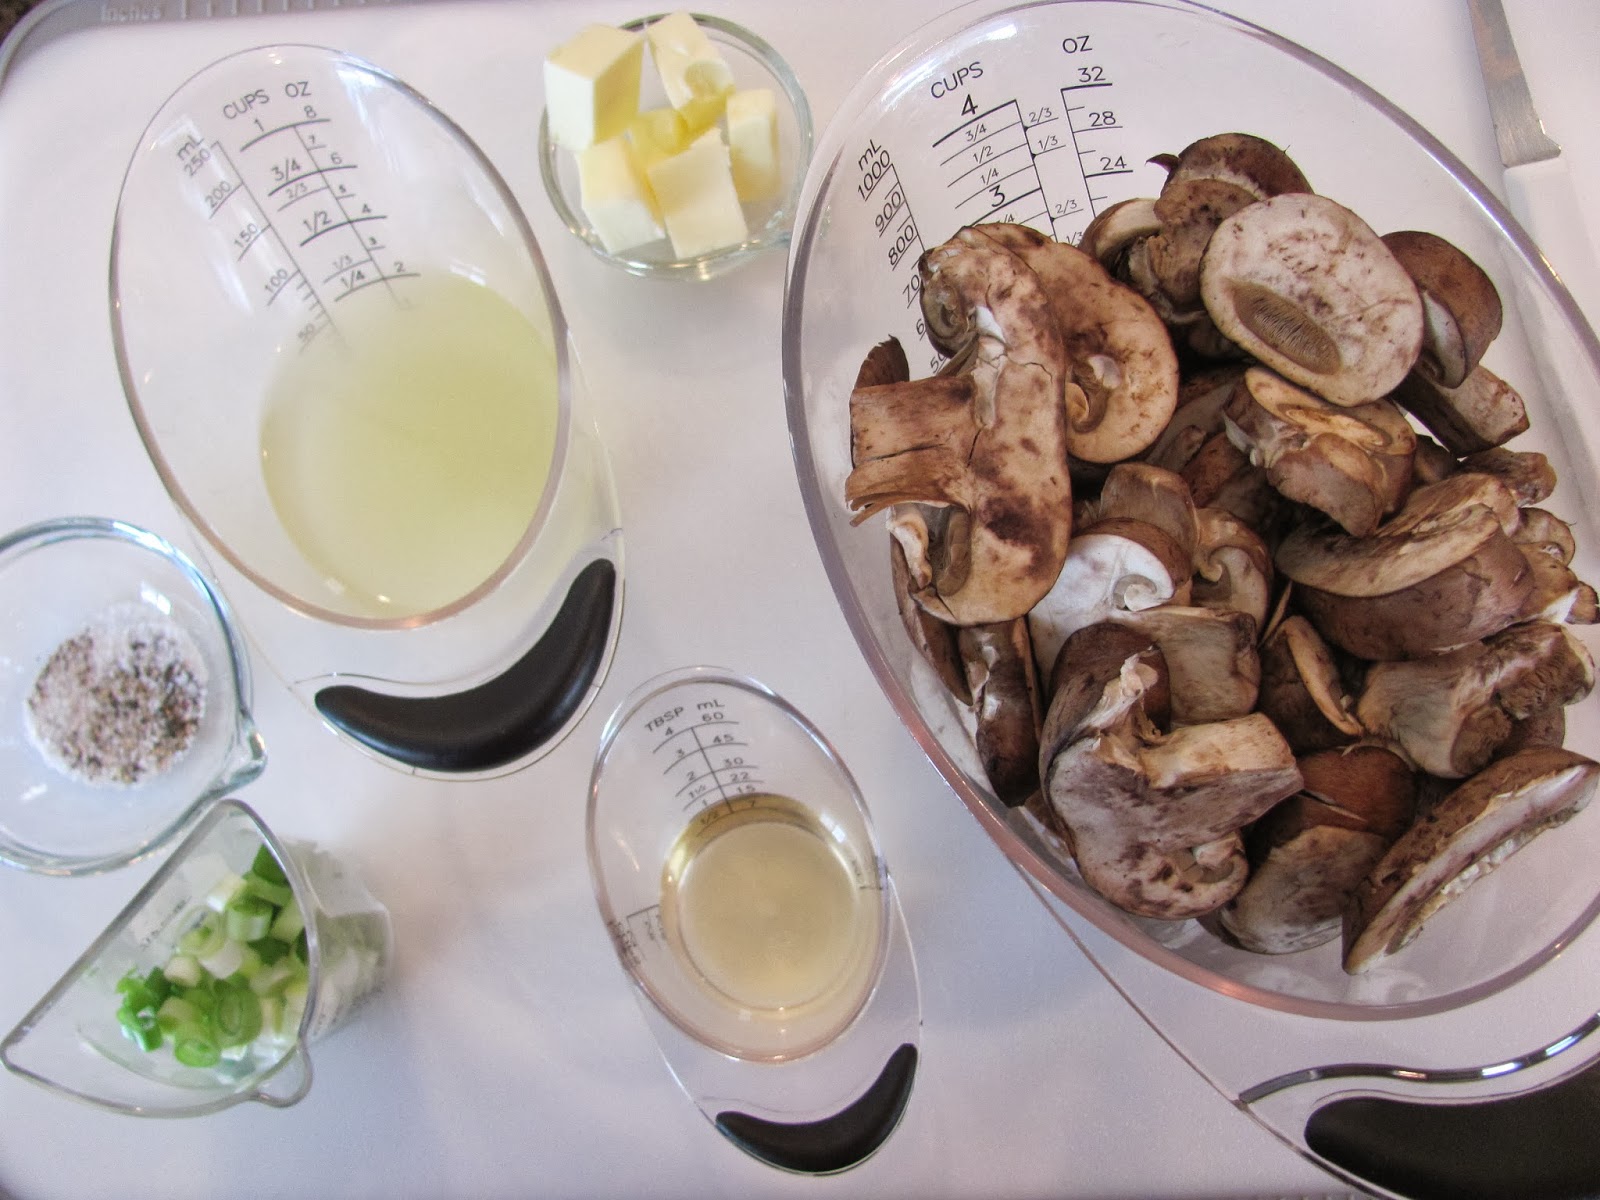

Salt, pepper, and butter are in Pinch Bowls.  Broth and mushrooms are in Easy Read Measuring Cups, and the vinegar is in the Mini Easy Read Measuring Cup.  Then there's the cute Scoop 'n Measure I mentioned.  Adorable!  As always, I'm using the Large Cutting Board to lay it all out.


One reason I like laying all of my ingredients out on a cutting board is that it makes it easy for me to set them right by the pan where I'm cooking.  Then I don't end up scrambling to find things when the skillet is hot and the next ingredient is needed.  By the way, my orzo is boiling while I'm melting the butter, so everything ends up finishing around the same time.


Like I noted in the recipe directions, I cooked my mushrooms more than four minutes.  They're just so much better if you let them get good and brown.  I mean, look at how delicious these look!  In fact, you could stop here and have a fabulous side dish.  Anyway, the mushrooms are in the 10" Skillet from the Executive Cookware Collection, and I used the Mix 'n Scraper as my spatula.


Once your mushrooms are done, you just mix everything together.  Stir in the chives, top with the cheese, and you've got a gorgeous side that's worthy of any dinner guest.  By the way, the first time I made this, I forgot the cheese, and it was still delicious.  Don't tell Cooking Light.

Like the products you saw used?
Shop Online 24/7 at pamperedchef.biz/jennylyn
E-mail me: chefjennylyn[at]gmail.com
Call me up: (205) 585-2464


Thursday, February 13, 2014

Chicken Stroganoff Pasta

 
Let me begin with an apology.  It's really difficult to make a creamy main course look appetizing, so I'm sorry that my delicious pasta looks like a pile of goop.  I promise it actually tastes really good!  I pulled this from a 2007 issue of Cooking Light a couple of years ago, and I was confused as to why there was no picture.  I'm no longer confused.
 
We all have our different versions of comfort food, but for me, anything creamy does the trick.  Warm, creamy, noodle-y chicken dish full of fresh mushrooms?  Sold!  This recipe is relatively simple to prepare once you have your prep work done, but it will throw you if you're sautéing onions before realizing the chicken needs to be dredged in the flour and paprika.  Prep, prep, prep!
 
Chicken Stroganoff Pasta
chefjennylyn.com
 
1/4 cup flour
1 tsp. paprika
1 lb. boneless, skinless chicken, sliced
1 tbsp. olive oil
 
1 tbsp. butter
1 1/2 cups chopped onion
2 tsp. fresh sage, chopped
1 1/4 tsp. salt, divided
1/4 freshly ground pepper, divided
8 oz. sliced mushrooms
 
1/2 cup less-sodium chicken broth
2 tbsp. sherry
1 cup reduced-fat sour cream
1 tbsp. flour
 
5 cups hot, cooked egg noodles
1/4 cup fresh parsley, chopped
 
Directions
 
Combine 1/4 cup flour with paprika, and dredge sliced chicken in mixture.  Set aside.
 
Melt butter in a large nonstick skillet over medium-high heat.  Add onion, and sauté 5 minutes or until tender.  Add sage, 1/4 tsp. salt, 1/8 tsp. pepper, and mushrooms; sauté 5 minutes or until mushrooms begin to brown.  Spoon mixture into a large bowl, and set aside.
 
Heat oil in pan, and add chicken.  Sprinkle with 1/4 tsp. salt and remaining 1/8 tsp. pepper.  Sauté 4 minutes or until chicken is done.  Add to mushroom mixture.
 
Whisk together sour cream and 1 tbsp. flour in small bowl.  Add broth and sherry to pan, scraping pan to loosen browned bits.  Reduce heat to medium-low; add sour cream mixture and remaining 1/4 salt.  Stir in chicken and mushroom mixture, and cook 1 minute or until thoroughly heated.  Add noodles and parsley, stirring well to combine.


This is what it looks like pretty much every time I cook.  I set my recipe up, get out the ingredients, and pull a few of my most-used kitchen tools.  Easy Read Measuring Cups, Scrapers, Large Cutting Board, 5" Santoku Knife, Measuring Cup Set, Measuring Spoon Set, Bamboo Grinders, and a few Prep and Pinch Bowls are out every time.  Cooking is easier when you place the things you need within arm's reach.


To get 1 1/2 cups of chopped onion, I used two medium ones.  To do them in the Manual Food Processor, simply quarter them, and place them in there one at a time.


A few pumps later, you have this.  Needless to say, I use my Manual Food Processor a lot.  No onion tears, no smell, and no chopped fingers!


I recently took a test to determine whether I was a nerd or a free spirit, and I was definitely a nerd.  I like having my ingredients measured and lined up before I cook, and measuring as I go stresses me out.  The good news is that I have great tools that make this possible!  Notice the sour cream in the Measure-All Cup.  If you have one of these and you've wondered how to use it, wonder no more!  Push it down, fill it up, and pop it out like a syringe.  (Browse the blog for more pics of it actually in use.  I was kind of in a hurry and didn't take a lot of step-by-step photos here.)


 As always, I sliced my chicken with the 5" Santoku Knife on the Large Cutting Board.  Once sliced, I put it in the Small Batter Bowl to await dredging.  In the background, you can see that my mushrooms are hanging in a Stainless Mesh Colander, and everything else is on another Large Cutting Board.

 
I like using the Cake Pan Set for dredging foods.  I also use these pans when I'm doing French toast.  There's plenty of surface area, and the sides are high enough to keep what's inside... inside.  Oh, and the handles - so handy!  Ok, so just dredge your chicken pieces, and lay them back out on the cutting board.
 

Water takes a long time to boil, so it's a good idea to get it started when you begin the rest of your recipe.  By the time it's boiling and your noodles are cooked, you're almost ready for them.  Here, I've got water in the 8-Qt. Stockpot from the Executive Cookware Collection, and the onions are in the 10-inch Skillet from the same.  Conveniently, one lid fits both pieces.


There aren't many other pictures because this is one of those recipes that moves pretty quickly once you start putting it together.  My mushroom mixture is in a Stainless Mixing Bowl here, and I'll add the chicken once it cooks.  Then it's just sauce, adding noodles, and done!  Oh, and the tool in the skillet is the Mix 'n Scraper, one of our four scrapers that won't melt, stain, or come apart.  I love using this in my pans and just leaving it while I do other things in the kitchen.  I don't have to worry about coming back to a marshmallowy mess!

If you're looking for something creamy and delicious during the cold wintery weather, try this pasta.  As always, let me know what you think!


Like the products you saw used?
Shop Online 24/7 at pamperedchef.biz/jennylyn
E-mail me: chefjennylyn[at]gmail.com
Call me up: (205) 585-2464


Friday, February 7, 2014

Creamy Mushroom Fettuccini


Want to know something about me?  I love recipes.  I have four three-ring binders full of them in my kitchen, and I have a fifth binder of to-dos.  The beauty of recipes is that they don't expire, so there's no pressure to try that pasta dish that looked pretty good... tomorrow.  This was in my to-do binder, and it immediately earned itself a spot as a keeper.  Enjoy installment 2 of the "You can do Valentine's Day at home" collection!
 
Creamy Mushroom Fettuccini
chefjennylyn.com

9 oz. refrigerated fresh fettuccini
1 1/2 tbsp. olive oil
3/4 cup chopped onion
16 oz. sliced mushrooms
3 garlic cloves, minced
3/4 tsp. salt, divided (1/4 and 1/2)
1/4 tsp. freshly ground black pepper
1/4 white wine (I sub chicken stock.)
1 tsp. chopped fresh thyme
1/2 cup half-and-half
1 oz. Parmesan cheese, grated (about 1/4 cup)

Heat a large, nonstick skillet over medium-high heat.  Add oil; swirl to coat.
Add onion, mushrooms, garlic, 1/4 tsp. salt, and pepper.  Sauté 12 minutes or until mushrooms are browned and have released their liquid. Add wine and thyme; cook 2 minutes or until liquid evaporates, stirring occasionally.  Remove pan from heat.

Cook pasta according to package directions.  Once drained, add mushroom mixture, 1/2 tsp. salt, half-and-half, and Parmesan cheese to pan, tossing to combine.  Serve immediately.

* This is from Cooking Light, but I tweaked a few things.  More mushrooms, more onion, and more garlic, specifically.


I've shown this before, but this is the quickest way to coarsely chop an onion.  Cut one end off, keeping the fuzzy end.  Then slice it down the middle.  I'm using the 5" Santoku and the Large Cutting Board, my two most often used tools.


Slice the onion into strips, and then slice across, ending at the fuzzy spot.  You'll end up with small, dices pieces, and you won't even have to chase slippery onion around the cutting board.  Safety first!


I never get sick of seeing the Garlic Press do its thing.  You don't have to peel the garlic!  If you're not cooking with fresh garlic, you're missing out. It's ridiculously inexpensive, and it adds so much to every recipe!  Garlic is going into a Pinch Bowl here.


I like to combine ingredients that are going at the same time during prep because it makes things a bit more efficient when the heat is up, and you're adding things in stages.  So just grind the pepper right on top of the garlic.  Looking around, I've got the mushrooms in a Stainless Mesh Colander, the onion in a 1-Cup Prep Bowl, the oil in a Mini Easy-Read Measuring Cup, and my garlic mixture in a Pinch Bowl.


I've found that keeping the Mini Mix 'n Scraper handy for adding ingredients is awesome!  This thing fits right inside my Prep Bowls, Pinch Bowls, and Measuring Cups, so I don't fumble around trying to get things out while what's in the pan continues to cook.  (You can burn garlic in hot oil really quickly while you're trying to get the onion to pour from its bowl.)


Once everything is in the pan, I switch to the Mix 'n Scraper, my favorite tool for cooking.  This thing is a great size for most jobs, and it won't melt when it's left in the hot skillet.  I'm using the 10-Inch Skillet from the Executive Cookware Collection, and the 8-Qt. Stockpot is behind it.  Here's a tip for a recipe where you need a pasta boiled and added to another mixture.  Start the pasta water while you do everything else, and then move it to a large eye of the stove when it's time to really get going.  If you begin with cold water when you actually need to be cooking the pasta, you're going to be waiting a really long time.


The mushroom mixture cooks for 10 minutes, so I use that time to prep the rest of my ingredients.  Stock and half-and-half are in Easy Read Measuring Cups, Parmesan is in a Measuring Cup, and thyme is in a Measuring Spoon.


You should smell this.  Beautiful!


Fresh pasta only cooks for a minute, so this recipe comes together very quickly once the mushroom mixture is done.


While the pasta cooks, I get everything ready to pour in once it's drained.


The pasta drains in a Stainless Mesh Colander, and then everything is added back to the big, hot pot, and it's stirred together to become a delicious dish that pairs so well with beef that it's scary.

For the steak seen in the first picture: Filet Mignon with Chive-Horseradish Butter
And the broccoli: Roasted Broccoli (with Pampered Chef Rub)

 
Like the products you saw used?
Shop Online 24/7 at pamperedchef.biz/jennylyn
E-mail me: chefjennylyn[at]gmail.com
Call me up: (205) 585-2464


Thursday, February 6, 2014

Filet Mignon with Chive-Horseradish Butter

 
Today is February 6th.  Valentine's Day is one week from tomorrow.  For a lot of people, that means a crowded restaurant, an overpriced meal, and sense that you've been herded in and out like cattle.  The solution?  Cook at home, friends!  A very nice meal can be prepared at home for a reasonable price, and you don't even have to tip at the end!  I'm all for really good food in my own house, so here's one of my favorite steak recipes.
 
Here are the other two recipes shown:
 
Filet Mignon with Chive-Horseradish Butter
chefjennylyn.com
 
5 tsp. butter, softened
1 tbsp. prepared horseradish
1 tbsp. minced fresh chives
4 beef tenderloin steaks
1/4 tsp. salt
1/4 freshly ground black pepper
Olive oil (for brushing steak)
 
Combine butter, horseradish, and chives in a small bowl; refrigerate 20 minutes.
 
Brush steaks with olive oil, and sprinkle evenly with salt and pepper.
 
Heat grill pan over medium-high heat.  Add steaks to pan, and cook 4-7 minutes on each side or until desired degree of doneness.  (This soooo depends on the thickness of your steak!) Scoop butter mixture onto each steak.
 

I cut the butter into small pieces using a Quikut Paring Knife, and it's softening in a 1-Cup Prep Bowl.  I'm mincing chives with my favorite knife, the 5" Santoku from the Forged Cutlery Collection.  Here's a great tip on mincing, slicing, and dicing: When you get to the end, just let it go.  Don't try to get every last bit, or you'll be much more likely to cut yourself.  For those of us who are simple home cooks, no one expects heroism.  This is how I've used great knives without falling victim to the blade.  I have no problem throwing out twenty-five cents worth of green onion tops.  As always, I'm using the Large Cutting Board for all of that beautiful surface area.


I love that the shape of the Measuring Spoons is such that they get down inside spice bottles, horseradish bottles, etc.


Let's just take a moment to admire this beautiful meat.  Scroll to the bottom for a breakdown of what this meal cost to prepare, but for now, is this not the thickest steak you've ever seen?  To be honest, I like to buy filet as an entire tenderloin, and then I cut the steaks myself, but the store was out of tenderloins, and I had to buy pre-cut.  If I'd had it my way, the total ounces here would have been six steaks, not four.  Oh, well.


One thing I love about the Large Cutting Board is that one side has wells, and the other doesn't.  Once I've finished my vegetables and non-meat items, I can flip it over for beef preparation.  Notice I said NON-MEAT items - Don't do meat and then flip... obviously.  I brushed the meat with olive oil using my Chef's Silicone Kitchen Brush (hidden by my hand), and I had my olive oil in a Prep Bowl.  Then a sprinkle of Pampered Pantry Salt and Pepper with my Bamboo Grinder Set, and I'm ready to go!


This is a great time to use the "Count Up" feature on the Clock/Timer.  When the pan is sizzling and the vent is running (Side note: Turn on the vent fan.), you don't want to be tracking how long something has cooked.


Cook on one side.  Flip.  Finish.  Boom!  I'm using the Chef's Tongs here because they're gentle with that tender, beautiful meat, and they won't melt in my hot pan.

 
It only seems right to show the steak one more time since that last picture was so smoky.  Let me break down what this meal cost to prepare at home.  This is enough for four servings of everything.
 
Beef Tenderloin: $9.99/lb.  I spent $23, but my steaks were crazy thick.
Horseradish: $1.12
Broccoli: $2.99
Pasta: $2.38
Mushrooms: $5.00
Onion: $1.00
Chicken Stock: $.89
 
Everything else was on-hand (olive oil, butter, salt, pepper, etc.), so the grand total was....
 
$36.29 for four people = $9.07 per plate.
 
*** If you order a grill pan from me, I'll pay your shipping.  Happy grilling!***
(Contact me directly for this offer at the phone or email below.)
 
Like the products you saw used?
Shop Online 24/7 at pamperedchef.biz/jennylyn
E-mail me: chefjennylyn[at]gmail.com
Call me up: (205) 585-2464


Tuesday, November 19, 2013

Dak Bokkeum (Korean Stewed Chicken)


A good Korean recipe is a sure win in my kitchen.  When Cooking Light featured an article in which a Korean woman shared some of her recipes, I was thrilled.  Then I made this, and I was even more thrilled.  This is true Korean food that's made with a healthy dose of gochujang (Korean chile paste), and it's delicious!  Do you enjoy ethnic food?  Are you attending an international potluck soon?  Are you seeking to woo a special Korean man?  Make this.
 
Dak Bokkeum (Korean Stewed Chicken)
chefjennylyn.com
 
1/3 cup gochujang (Korean chile paste)
1 cup sliced green onions
2 1/2 tbsp. lower-sodium soy sauce
2 tbsp. minced fresh garlic
2 tbsp. minced peeled ginger
2 tbsp. dark sesame oil
1 tbsp. brown sugar
3/4 tsp. crushed red pepper
 
2 lb. boneless, skinless chicken thighs, sliced into strips
1/3 cup water
 
Rice or Asian noodles to serve
 
Combine the first 8 ingredients in a large bowl.  Stir in chicken.  Cover and marinate 30 minutes.
 
Bring 1/3 cup water to a boil in a 4-qt. pot.  Add chicken mixture, and bring to a simmer.  Cover, reduce heat, and simmer 20 minutes.  Uncover, and simmer 10 minutes or until thickened, stirring occasionally.  Serve over rice or Asian noodles.


When you're talking about slicing a cup worth of green onions, it's nice to have a good knife.  Enter: 5" Santoku Knife from the Forged Cutlery Collection.  It's my favorite, as you probably already know if you've ever read one of my posts.


All of my prepped ingredients are on the Large Cutting Board.  I've got Adjustable Measuring Spoons, the Easy Read Measuring Cups, an Easy Read Mini Measuring Cup, standard Measuring Spoons, a Kitchen Scraper, and a Vegetable Peeler working hard.


The Measure-All Cup is a Pampered Chef staple.  This thing is amazing!  Load it with a sticky ingredient, pop it out, and scrape it off.  I'm using the Skinny Scraper and the Classic Batter Bowl on this mixture.


Stir all of those beautiful ingredients together, and add the chicken.  This is one of those times I'm really glad the Batter Bowl includes a lid!


Don't skip the 30 minutes to marinate the chicken.  Trust me on this - totally worth the wait!


I'm using the 4-Qt. from the Executive Cookware Collection.  Also, I'm assuming you know this, but put the lid on when you want to bring water to a boil.  It significantly reduces the wait!

 
Notice how the Classic Scraper gets all of that marinade off the sides of the bowl.  Love my scrapers! I can almost taste this through the computer screen...
 
Let me make a couple of quick notes about this recipe.  One: It's spicy.  Two: It doesn't make enough to serve a crowd, so double the recipe if you're inviting company for dinner.  Three: Tell me if you make this!  Four: Enjoy.
 
Like the products you saw used?
Shop Online 24/7 at pamperedchef.biz/jennylyn
E-mail me: chefjennylyn[at]gmail.com
Call me up: (205) 585-2464


Thursday, November 14, 2013

Lighter Philly Cheesesteaks

 
I have a weakness for hot sandwiches, especially when it's cold outside.  There's something so comforting about bread, meat, cheese, vegetables, and more cheese.  When I found this recipe for lightened up cheesesteaks, I knew it was a must-try.  Sure enough, the sandwiches were great, and I knew I'd be making them again.  I promised myself that when I did, I'd take pictures to share with you!  If you're looking for warm comfort food that doesn't leave you feeling heavy and gross, here you go.  Happy cold weather, everyone!
 
Lighter Philly Cheesesteaks
chefjennylyn.com
 
1 flank steak, trimmed (12 oz.)
1/4 tsp. kosher salt
1/4 tsp. freshly ground pepper
8 oz. sliced mushrooms
2 tsp. olive oil, divided
1 cup thinly sliced onion
1 1/2 cups thinly sliced green bell pepper
2 garlic cloves, pressed
1/2 tsp. Worcestershire sauce
1/2 tsp. lower-sodium soy sauce
4 hoagie rolls
Reduced-fat Provolone cheese slices
 
Thinly slice beef across the grain.  Sprinkle with salt and pepper.
Heat a large nonstick skillet over medium-high heat.  Add 1 tsp. olive oil to pan, and sauté beef 2 minutes or until it loses its pink color, stirring constantly.
Remove beef from pan, and cover to keep warm.
Add remaining 1 tsp. oil to pan.  Add onion, and sauté 3 minutes.  Add mushrooms, bell pepper, and garlic.  Sauté 6 minutes.
Return beef to pan with vegetables, and sauté until everything is thoroughly heated, and vegetables are tender.  Remove from heat, and stir in Worcestershire and soy sauces. 
Hollow out the top and bottom halves of bread, leaving a 1/2-inch-thick shell.  Fill with a serving of beef mixture, and top with cheese.  Place under oven broiler until cheese melts.
 

The onion slicing method: Half whole onion.  Cut off bottom, but keep the fuzzy end.  Slice onion vertically.  Cut off the fuzzy end.  Hello, beautiful slices you didn't chase all over the cutting board.  Speaking of that, this is my Large Cutting Board, and that's my 5" Santoku Knife from the Forged Cutlery Collection.  Power team, if you will.

When I've got ingredients going in a recipe at the same time, I like having them in the same bowl.  I rinsed my mushrooms in the smallest of my Stainless Colanders, and I put that in the 2-Qt. Stainless Mixing Bowl.  Then I added my bell peppers once they were sliced, and I'm pressing my garlic directly on top.  No peeling with the Pampered Chef Garlic Press!


To make slicing the beef easier, place in in the freezer fifteen minutes before you're ready for it.  Just stick it in there before you get your other ingredients out and prepped, and you'll be ready for it at the perfect time.  Those few minutes will make a big difference when you're trying to get thin slices.  Again, Large Cutting Board and 5" Santoku Knife.


Last step: Sauces.  The Pinch Bowls are so great for things like this because they've got little pour spouts on them.  (Rabbit chase: The lids for these bowls are just so cute with their little beak looking things that fit around the pour spouts!)  I'm using a spoon from the Measuring Spoon Set, and I'm putting both sauces together at the same time since they'll be added in one step.


Everything is prepped and ready to go, so this is going to be super simple to cook.  Beef is on the Large Cutting Board, sauces are in a Pinch Bowl, mushrooms, peppers, and garlic are in the Small Stainless Colander, onion is in a 2-Cup Prep Bowl, and olive oil is in the Dripless Oil Bottle.


I love the Dripless Oil Bottle because it truly is impossible to drip with it.  The pour is manageable, so you don't have to worry about accidentally dumping 1/4 of oil in your pan when you were aiming for a teaspoon.  This is the 10" Skillet from the Executive Cookware Collection, and it's my go-to pan for most things.  The size is awesome, and the sides are tall enough to keep things from flying when I get crazy stirring.


Bamboo Pepper Grinder!  Freshly ground salt and pepper will make a huge difference in the flavor of your food, and I love these grinders because you can see exactly how much you have left.  Notice I really need to refill this one...


Get those onions in there after the beef, and let them sweat a few minutes before adding peppers and mushrooms.


It just makes me happy to have a skillet full of beautiful vegetables with very little oil.  That's another benefit of the Executive Cookware, one that directly impacts your health.  Less oil and butter because you're not using it to keep your food from sticking to the pan.


Alright - here we go!  I'm slicing a hoagie roll on the Cutting Board (not my favorite large since it just had beef on it), and I'm using the Bread Knife from the Forged Cutlery Collection.  Let me just tell you that you don't know what you're missing by not having a bread knife until you get one.  Then it's kind of like, "Wow - I don't mind slicing loaves of French bread anymore!"  Once you've sliced almost but not all the way through your bread, hollow it out.  Trust me - lots of calories saved here!  (Put the inside bread in the freezer for bread crumbs. Pulse frozen bread through your food processor, and stop buying bread crumbs at the store.)


This is on the Medium Bar Pan, and it's about to become crazy delicious!  About a minute under the broiler, and I've got a sandwich that looks and tastes like $7.00.

One thing I really like about this recipe is that you can just make one sandwich at a time.  Since I work from home, it's nice to have things in my arsenal that are simple, delicious, and produce leftovers for another day.  Score!

Like the products you saw used?
Shop Online 24/7 at pamperedchef.biz/jennylyn
E-mail me: chefjennylyn[at]gmail.com
Call me up: (205) 585-2464