Thursday, April 17, 2014

Chicken Kabobs... and Plan B


My husband and I recently completed Dave Ramsey's Financial Peace University through our church, and we met some fun friends in the process.  (Side note: The course is worth it for the lessons on insurance and investing alone.)  Last night we had the two couples with whom we were paired for the course over for dinner, and it was awesome!  The plan was to grill, and what a great plan it was!  Then our grill got buried in white stuff.  That's right- April 16th, and a sudden snow.  Welcome to Minnesota.  Fortunately, we had a Plan B: The Pampered Chef Double Burner Grill Pan!  Read on to see how completely salvaged our menu!

Chicken Kabob Marinade
chefjennylyn.com

1 pack Italian salad dressing mix
3 tbsp. olive oil
1/4 cup vinegar
1/2 cup water
1 tsp. freshly ground pepper
1 tsp. pressed garlic
1 tbsp. honey

Whisk all ingredients together, and marinate meat and vegetables a minimum of 3 hours.  (Overnight is great.) 

Intended ratio: 1 lb. chicken / 5 different vegetables / 1 recipe marinade

Note: My meat/vegetable-to-marinade ratio was way off, so I think I ended up with something a lot milder than intended.  I didn't realize it until I was already marinating everything.  Oh, well. 


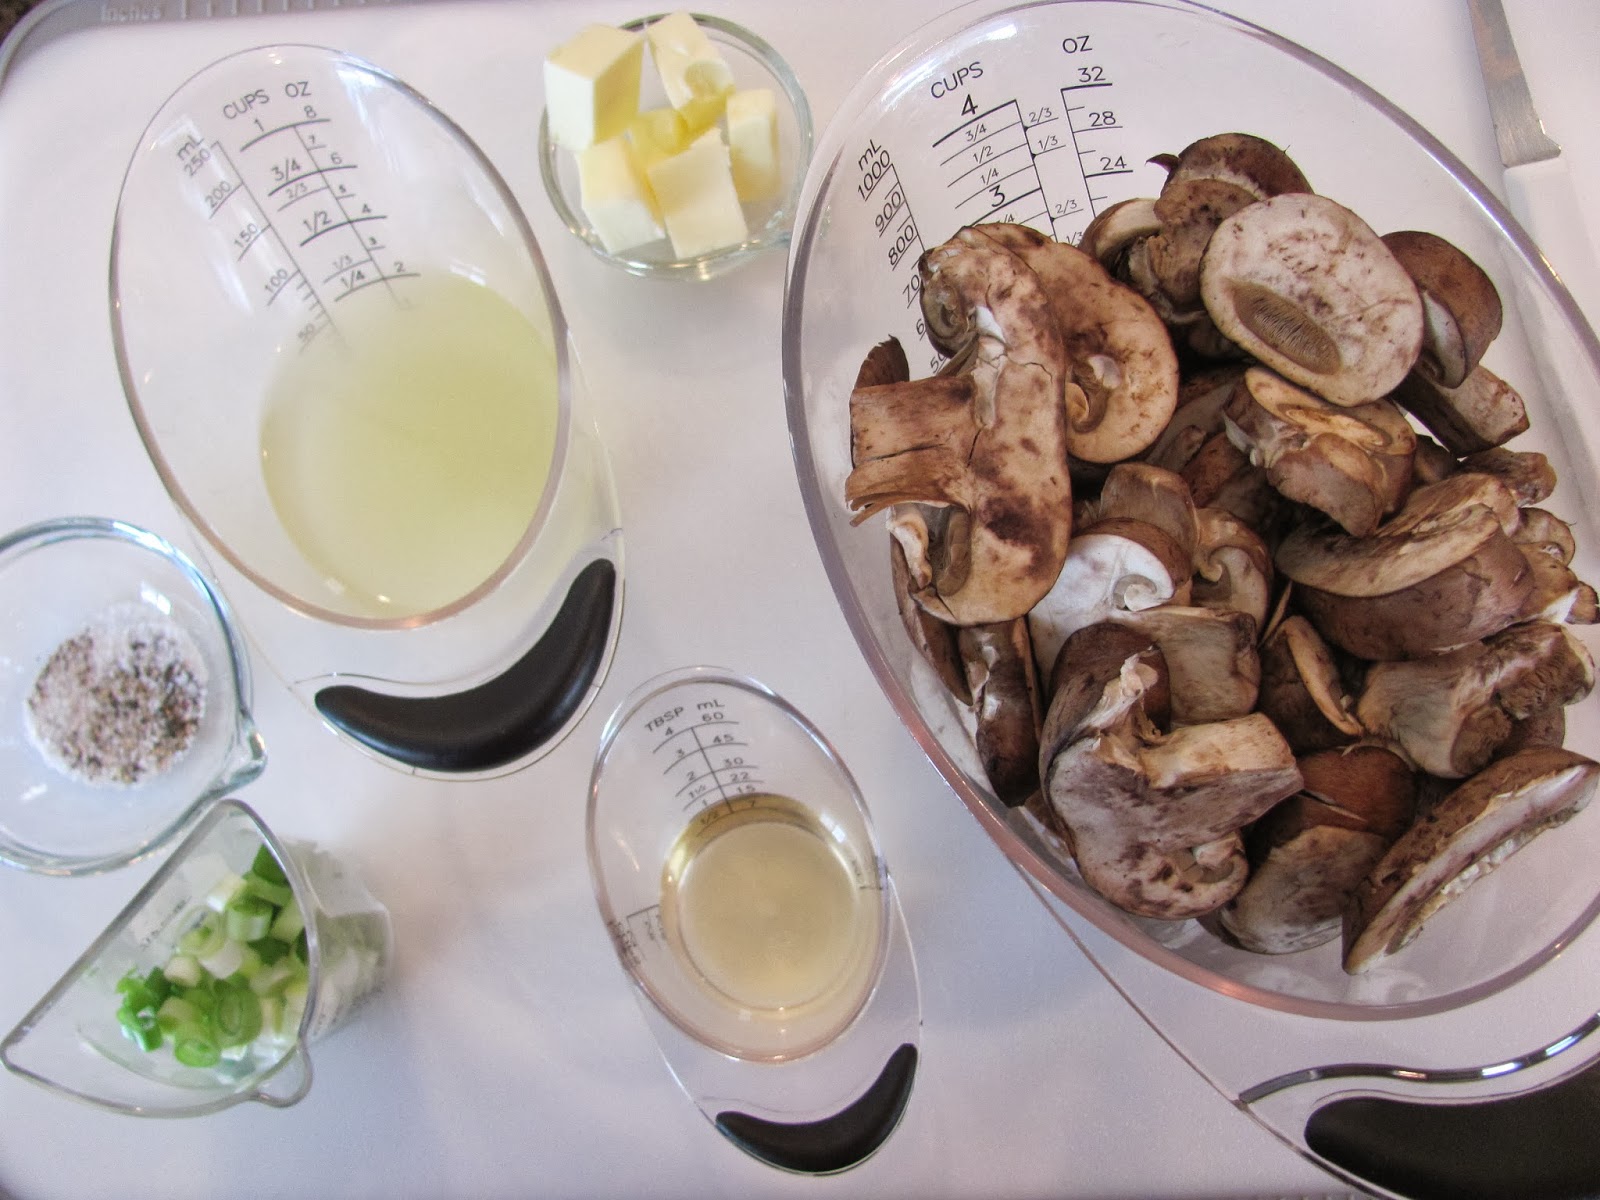
As always, everything is measured before adding it to the Stainless Mixing Bowl.  I'm using a Measuring Spoon, a Measuring Cup, the Easy Read Mini Measuring Cup, an Easy Read Measuring Cup, and the Garlic Press.  That's the Large Cutting Board, as always.  Then I'll whisk everything with the Stainless Whisk, one of my favorite tools ever!


You know what I love?  Beautiful vegetables.  My mushrooms are in a Stainless Mesh Colander, and you can see the Bamboo Grinder Set ready to go.  How about being able to tell when you're almost out of salt or pepper before, well, you're out of salt or pepper?


Tip: If you're only using half of your bell pepper, leave the seed bulb intact in the reserved half.  It makes it last longer.  Background: 5" Santoku Knife from the Forged Cutlery Collection.  Best.  Knife.  Ever.


Does it not just make you happy to see your healthy dinner coming together?  Veggies are in a Stainless Mixing Bowl with a Mix 'n Scraper, and chicken is in the Classic Batter Bowl with a second Mix 'n Scraper.  Marinate away, delicious food!


Whoa - I stirred in a pound of mushrooms.  Things just got real.


This was the point when I realized the snow wasn't stopping, and I might not be able to get to the grill by the time I needed to cook.  Can you see how hard it's coming down out the window?  Can you see that my grill is already covered?  Yep.


The BBQ Skewer Set comes with four skewers, and they're loooong.  As in, "Thank you, Stoneware Bar Pan for being awesome" long.  I made sure six skewers would fit, and then I portioned my chicken where the Large Cutting Board's well could catch any juices.  P.S. Those are food handling gloves.  So handy for jobs like skewering raw chicken!


These look good!  I put them in the oven and used the broiler for about 15 minutes.  Then I finished them in the Grill Pan because I wanted grilled kabobs.


The Double Burner Grill Pan and a set of Chef's Tongs will be your best friends if you want the grilling experience minus the grill.  Live in an apartment where you're not allowed to have one on your deck?  Problem solved.


I grilled vegetables, too!  My plan was to do these on the Grill Tray out back, but this worked and made the house smell delicious.


Then the corn.  Like the chicken, I started it in the broiler and finished it in the Grill Pan.


Have I told you grilled corn is one of my favorite foods?  It is.


I love, love, love having friends over for dinner parties!  Maybe if I'm super nice to her, Bekah will let me share the recipe for the amazing beer bread she and Jason brought.  The stuff was addictive!


Good times with good friends! Now my heart is all warm and fuzzy, and I need to get the next dinner on the calendar!

 
That's me with the kabob.  I think I was giddy that I didn't ruin dinner due to completely switching gears at the last minute.  How cool is it that my husband will still pose with me when I'm cradling a stinking chicken kabob?  He's the best!

Happy grilling, be it indoor, outdoor, or anything in between!
 
 
Like the products used?
Shop Online 24/7 at pamperedchef.biz/jennylyn
E-mail me: chefjennylyn[at]gmail.com
Call me up: (205) 585-2464


Tuesday, April 15, 2014

Blue Cheese Coleslaw


Guess what?  I hate blue cheese.  Guess what else?  I love this coleslaw.  I don't know how that happens, but I'm pretty sure this is one of my favorite side dishes now.  When my brother and his family moved from Memphis to Birmingham, I started eating at their house a good bit.  I mean, I was single, and I wasn't cooking a whole lot.  Then there was my sister-in-law Shannon and her knack for finding good recipes, so why would I ever turn down an invitation?  (Of course my adorable niece and nephews had nothing to do with my being there so much...)  One meal in particular blew my mind: beef brisket with homemade bbq sauce, some kind of salad, and blue cheese coleslaw.  I don't know - maybe I was just really hungry that night, but yeah, I went pretty nuts on everything.  When my husband and I recently accepted a dinner invitation that involved grilling burgers, I knew the time was right to try my own hand at Shannon's masterpiece.

Blue Cheese Coleslaw
chefjennylyn.com

2 pounds cabbage, shredded (I used coleslaw mix.)
8 oz. blue cheese, crumbled
1/2 cup apple cider vinegar
1/4 tsp. dry mustard
1 1/2 tsp. celery seeds
2 cloves garlic, minced
1/2 tsp. salt
Pepper to taste
2 tbsp. sugar
1/4 cup minced onion
3/4 cup vegetable oil

In a large bowl, toss cabbage and blue cheese together.  Chill one hour.
Whisk remaining ingredients in a separate bowl.  Chill one hour.
Toss together just before serving.
Serves 8-10

Note: I cut the recipe in half to serve 4-5.
Shannon got this recipe from Treebeards, a restaurant she enjoys.


The original recipe serves 8-10, but I decided to cut that in half.  What happens when you want half of 1 1/2 teaspoons of celery seed?  The Adjustable Measuring Spoon does 3/4 tsp.!  How awesome is that?  The above ingredients are organized on the Cutting Board using the Scoop 'n Measure, Measuring Spoons, an Adjustable Measuring Spoon, and an Easy Read Measuring Cup.  I always do this before adding anything to a mixing bowl because I can avoid this scenario: Add a few things.  Phone rings.  Answer.  Don't remember if I already added the sugar/salt/etc.  When it's all right in front of you, you're less likely to make mistakes.


Again, cutting the recipe in half, I ended up with an awkward measurement.  I needed half of 3/4 cup of oil.  Guess what?  This Easy Read Measuring Cup shows that 3/4 cup is 6 oz., so I can just measure to... 3 oz. It's the little things!


This never gets old.  If you don't have the Garlic Press, stop what you're doing, call me, and order one.  You don't have to peel the garlic!


Cabbage mixture + blue cheese = Get ready for awesome!


The cabbage/blue cheese mixture is in the Medium Stainless Mixing Bowl, and everything else is whisked in the Small Stainless Mixing Bowl.  I used a Bamboo Spatula and the Mini Stainless Whisk to get these mixed to perfection.


This is a beautiful, refreshing, adult side dish that you can be proud to take to your next gathering.  The fact that it's insanely easy to put together is just a bonus.  Let me know if you make it!

Like the products used?
Shop Online 24/7 at pamperedchef.biz/jennylyn
E-mail me: chefjennylyn[at]gmail.com
Call me up: (205) 585-2464


Wednesday, March 26, 2014

S'more Cake


If this recipe title made you think of The Sandlot, I consider you an immediate friend.  If not, all I can say is, "You're killing me, Smalls!"  Moving on...

If you're having people over or you're supposed to take a dessert to a function, do you assume baking a pan of boxed brownies or maybe a sheet of slice 'n bake cookies are your two quickest "I made these myself!" options?  If so, you're WRONG!  This cake is absolutely faster than either of those, and if you think I'm nuts for saying that, I totally understand.  I'd been hearing rumors from other Pampered Chef consultants that this cake was amazingly easy and that it only took a few minutes, but I somehow never got around to making it.  That's embarrassing.  Anyway, I tried it for the first time the other night (in front of my show host and her guests, mind you), and I was blown away!  There is no measuring.  There is no pre-heating the oven (Use the broiler for less than a minute.).  There is no mixer.  There is no waiting for anything to cool so that it can be dipped off of or out of a burning hot pan and displayed appropriately.  Read on to find out why I will always have the ingredients for this ridiculously easy cake on hand.

S'more Cake
chefjennylyn.com

3 Hershey bars, broken into pieces
1 small package (9 oz.) devil's food cake mix
     (Use 1 2/3 cups of a standard box if you can't find the small size.)
1 egg
1 8-oz container sour cream
1 bag regular marshmallows or 4 cups mini-marshmallows
3 whole graham crackers, coarsely crushed

Place oven rack in the center of the oven.  Turn on the broiler.

Microwave chocolate in 2-cup Prep Bowl 30-60 seconds or until mostly melted.  Stir until smooth, and set aside.  (I start at 40 seconds, stir, and go 10 more seconds.)

Combine cake mix, egg, and sour cream, and stir until blended.  Pour batter into Rockcrok.

Microwave, covered, on HIGH 4-5 minutes or until center of cake is firm and springs back when pressed.

Remove pan from microwave, arrange marshmallows in an even layer over cake, and broil 30-60 seconds or until marshmallows are golden brown.

Remove cake from broiler, sprinkle with graham crackers, and top with chocolate.

*** Milk warning: You'll need a glass.


See these ingredients?  They're all you'll need for this cake.  Seriously.  Cake mix is in a Stainless Mixing Bowl, and the Rockcrock (2.5-qt.) is sitting there with the marshmallows and Mix 'n Scraper.  Notice the marshmallows are closed with a Twixit! Clip... 14 years as a consultant, and I still get excited about the stinking bag clips.  The egg and chocolate are in 1 and 2-Cup Prep Bowls, and that's the Large Cutting Board underneath.


This batter will be thick, and it won't seem like there's a whole lot of it.  Just trust the recipe, and get ready for this to rise into a delicious base layer for the s'more deliciousness you're after.  The Rockcrok here is the 2.5-Qt. Everyday Pan, but there's also a 4-Qt. Dutch Oven if you're looking for something a little bigger.  These things are awesome!  They go in the microwave, the oven, the freezer, and on the grill!  Did you catch that?  These are your new pans for recipes that start on the stove, move to the oven, and finish on the grill.  (You have a ton of those in your recipe box, right?)


Arrange your marshmallows, and put them under the broiler until they're golden, puffy, and crazy delicious.  Trust me when I say you'll never get marshmallow results like this over a fire.  That's fun and all, but for every one good marshmallow, you get ten that are either charred or in the fire... and extra charred.


I'm sorry for the lack of pictures, but there's just not a lot to show.  I mean, you top with the graham crackers, drizzle the chocolate over the top, and you're done.  Then you can even cover with the Rockcrok lid for easy transport! 

Let me know when you make this... and you're welcome.

Like the products you saw used?
Shop Online 24/7 at pamperedchef.biz/jennylyn
E-mail me: chefjennylyn[at]gmail.com
Call me up: (205) 585-2464


Thursday, February 27, 2014

Texas Sheet Cake


I like cake.  My small group came over last night, and I used it as an opportunity to unleash a new recipe.  A Cooking Light reader recently revealed this as her go-to dessert for church suppers, funerals, and baby births for the past decade, and I knew it had to be good.  I mean, if it's someone's standby for every occasion, something's got to be right with it, right?  Sure enough, this cake was (and is - anyone want to come eat some?) delicious.  With a thin layer of dense chocolate cake topped by cooked fudge icing and pecans, Texas sheet cake has made it into my recipe arsenal, and here's hoping it finds a home in yours.

Texas Sheet Cake
chefjennylyn.com

Oil/Butter/Shortening to prepare pan
2 tsp. flour for pan

Cake
2 cups flour
2 cups sugar
1 tsp. baking soda
1 tsp. cinnamon
1/4 tsp. salt
3/4 cup water
1/2 cup butter
1/4 cup unsweetened cocoa
1/2 cup low-fat buttermilk
1 tsp. vanilla
2 large eggs

Icing
6 tablespoons butter
1/3 cup fat-free milk
1/4 cup cocoa
3 cups powdered sugar
2 tsp. vanilla
1/4 cup chopped pecans, toasted

Preheat oven to 375 degrees.

Coat a 15 x 10-inch pan with oil, butter, or shortening, and dust with flour.  Set aside.

Stir together flour, sugar, soda, cinnamon, and salt in a large bowl.  In a saucepan, combine water, 1/2 cup butter, and 1/4 cup cocoa.  Bring to a boil, stirring, frequently.  Pour into flour mixture, and beat at medium speed until well blended.  Add buttermilk, 1 tsp. vanilla, and eggs; beat well.  Pour batter into prepared pan, and bake for 17-20 minutes or until toothpick inserted in center comes out clean.

For the icing, combine 6 tablespoons butter, milk, and 1/4 cup cocoa in a saucepan.  Bring to a boil, stirring constantly.  Remove from heat, and gradually stir in powdered sugar.  Stir in 2 tsp. vanilla and pecans, and spread mixture over hot cake.  Cool completely on a wire rack.


The Measuring Cup Set is so valuable when baking.  With the Leveler Tool, you can make sure you have exactly what you need in your cup.  Here, I'm measuring into a Stainless Mixing Bowl where I'll whisk my first set of ingredients together.


If I'm making a cake from absolute scratch like this, I want to use good ingredients.  Enter: Pampered Chef's Cinnamon from the Pampered Pantry.  All of our seasonings are excellent, but this is my favorite.  It takes a recipe from having a bit of cinnamon to, "Wow, the cinnamon in this adds so much!"  As always, I'm prepping my ingredients before mixing everything together.  That way there's no confusion about whether or not something has already been added.  My flour and sugar are in a Stainless Mixing Bowl, my cinnamon is in a Measuring Spoon, and my baking soda is in a Pinch Bowl.  The trusty Stainless Whisk is ready to combine the dry ingredients perfectly.


This is an excellent use for the Stainless Silicone Whisk.  When you've got a sauce or something you need to stir in your Executive Cookware, you can just hammer away at it without worrying about scratching the pan.  For my chocolate mixture, I have the water in an Easy Read Measuring Cup, butter in a Prep Bowl, and cocoa in a Measuring Cup.  Everything is on the Large Cutting Board, my go-to for all prep work.


One of my favorite features about the Executive Cookware is the lip design.  With this saucepan, I don't have to worry about my chocolate mixture dripping everywhere while I'm trying to pour it in the mixer.  Here's the scenario: Fast mixer, hot pan, liquid chocolate that just came off the boil.  Do you think I want to deal with drips right now?  The Pampered Chef knows this, and they design their products around it.


First of all, 1 tsp. of my vanilla is mixed with the buttermilk already, so don't be scared of that weird concoction.  That's one of my shortcuts when cooking and baking; if multiple ingredients are poured at the same time, go ahead and combine them.  You can see my eggs are already cracked into a 1-Cup Prep Bowl.  Do not skip this step!  If you crack an egg directly into cake batter, you can't salvage anything if there's blood in the egg.  I've only had two bloody eggs in all of my cooking, but the last one was a few weeks ago, and it was bad enough to make me switch brands.  Had I cracked what I found in that egg directly into this cake batter that required me to cook chocolate sauce, I'd have cried.  Then I'd have thrown some things and cried some more.  Truth.


You know I'm excited to use my Large Bar Pan!  This is my favorite piece in the entire Stoneware collection, and you can tell by those beautifully browned sides.  Never use Pam or any other aerosol spray with your Stoneware!  The additives will create a cakey, mucky sludge that's next to impossible to get off, and that's not warrantable for a replacement.  Instead, get the Kitchen Spritzer, add your own oil, and use that it spray pans as needed.  Of course, you can also just brush some oil or butter as needed.  With seasoned stones such as this, I don't add anything to the pan unless I'm doing a cake or bread.  Since those items are finicky about sticking, I take the "Better safe than sorry" approach.


Here's the best system for measuring powdered sugar.  Measure over the Small Batter Bowl, dump into a Stainless Mixing Bowl, and pour what's in the Small Batter Bowl back into your container.  This is so much easier than measuring over your container or bag.  Does it mean one extra dish dirtied?  Yes.  Is it worth it not to have powdered sugar all over your kitchen?  Absolutely.

 
Let me leave you with this because I care.  This is the next morning when I still have 3/4 of my pan full of cake.  Who's coming to help me out?  Thank you, Lord, for freezers.
 
 
Like the products you saw used?
Shop Online 24/7 at pamperedchef.biz/jennylyn
E-mail me: chefjennylyn[at]gmail.com
Call me up: (205) 585-2464

Monday, February 24, 2014

Mushroom Orzo


Finding a good side dish is a huge, huge score!  I served this orzo a couple of weeks ago, and I knew I needed make it again for the blog.  I mean, you've got the fun of orzo, the delicious flavor of portobello mushrooms, and the fancy touch of Romano cheese.  What's not to love?  The best part is that the flavors say weekend, but the simplicity says weeknight.

Mushroom Orzo
chefjennylyn.com

3/4 cup uncooked orzo
1 1/2 tablespoons butter
3 cups sliced cremini (portobello) mushrooms
1/2 tsp. black pepper
3/8 tsp. salt (Ok, I estimated because... 3/8?)
1/4 cup chicken broth
1 tablespoon white wine vinegar
1/4 cup minced chives
1 oz. Romano cheese (about 1/4 cup)

Cook pasta according to package directions, omitting salt and fat.

Melt butter in a large skillet over medium heat; cook 1 minute or until lightly browned. (This step is important.  Browning the butter lends a depth of flavor you'll miss if you rush.)  Add mushrooms, salt, and pepper.  Cook 4 minutes or until mushrooms release their liquid, stirring frequently.  (I cook mine longer.)

Add broth and vinegar; stir in orzo and chives.  Top with cheese.

* This recipe is from Cooking Light, my favorite food magazine, but I changed a couple of things.  The original calls for white balsamic vinegar, but I used what I already had, and it worked just fine.


Let me take a second to tell you how much you need the Bamboo Grinder Set.  These are the most attractive grinders I've ever seen, and they're backed by the quality of the Pampered Chef.  The best part is that you can actually see when you're running out of something instead of figuring it out while in the midst of four hot burners.  I measured all of my ingredients, and then I used the 3 1/2" Paring Knife from the Forged Cutlery Collection to slice my chives.  To finish, I scooped them with the cute little Scoop 'n Measure.  (See below.)


Salt, pepper, and butter are in Pinch Bowls.  Broth and mushrooms are in Easy Read Measuring Cups, and the vinegar is in the Mini Easy Read Measuring Cup.  Then there's the cute Scoop 'n Measure I mentioned.  Adorable!  As always, I'm using the Large Cutting Board to lay it all out.


One reason I like laying all of my ingredients out on a cutting board is that it makes it easy for me to set them right by the pan where I'm cooking.  Then I don't end up scrambling to find things when the skillet is hot and the next ingredient is needed.  By the way, my orzo is boiling while I'm melting the butter, so everything ends up finishing around the same time.


Like I noted in the recipe directions, I cooked my mushrooms more than four minutes.  They're just so much better if you let them get good and brown.  I mean, look at how delicious these look!  In fact, you could stop here and have a fabulous side dish.  Anyway, the mushrooms are in the 10" Skillet from the Executive Cookware Collection, and I used the Mix 'n Scraper as my spatula.


Once your mushrooms are done, you just mix everything together.  Stir in the chives, top with the cheese, and you've got a gorgeous side that's worthy of any dinner guest.  By the way, the first time I made this, I forgot the cheese, and it was still delicious.  Don't tell Cooking Light.

Like the products you saw used?
Shop Online 24/7 at pamperedchef.biz/jennylyn
E-mail me: chefjennylyn[at]gmail.com
Call me up: (205) 585-2464


Tuesday, February 18, 2014

Creamy Bacon Dip


Take in this top picture, and make a mental note that bacon and green onions on top of a warm, creamy dip should happen in your kitchen soon.  You're welcome.

My husband and I had friends over for a staycation Friday and Saturday, which is just a way of saying we had an adult slumber party.  This was a two-day event, meaning we needed lots of food - "bad for you" food!  This dip had been in my to-do binder, and I had a feeling it would be the perfect appetizer to serve between brunch and lunch.  Turns out, I was right!  With everyone's hearty approval, creamy bacon dip has earned its place as a keeper.  It had us all at bacon.

Creamy Bacon Dip
chefjennylyn.com

8 oz. cream cheese, soft
2 cups sour cream
3 oz. bacon, cooked and crumbled
2 cups cheddar, shredded
1 cup green onion, chopped
Extra bacon and onions for garnish

Preheat oven to 400 degrees.
Mix all ingredients, and place them in a 1-qt. dish.  Cover, and bake 25-30 minutes.


Bacon on stoneware?  Absolutely.  For just a few pieces, I use the Medium Bar Pan, but I go with the Large when I'm cooking more.  Heat the oven to 415 degrees, and cook the bacon 20-30 minutes or until you're desired degree of doneness.  I like mine thick and crispy, so I'm more 35-40 minutes. 


Don't you love simple recipes?  There are just a few ingredients to mix together, and you're done.  Sure, you need to cook the bacon and chop the onions, but those are simple tasks that can even be done ahead of time.  In this picture, cheese and sour cream are in a Stainless Mixing Bowl, and more sour cream is in the Measure-All Cup.  Then I've got cream cheese in the Classic Batter Bowl and onions on the Large Cutting Board with a 1-Cup Prep Bowl ready to receive.  The Round Covered Baker is in the back for the actual baking part.


Produce is pretty, especially when the light is good.


Bacon is also pretty nice, especially when you know you're about to eat it.  I used my 5" Santoku Knife from the Forged Cutlery Collection for all the slicing and dicing in this recipe.  Side note: You might want to cook an extra piece or two of bacon for nibbling.  Just a thought...


Pop the sour cream out of the Measure-All Cup, and you're ready to go!  To be perfectly honest, I think I'd cut the sour cream by 1/4 or 1/2 cup next time around.  Two cups just seems like a lot, and it's slightly overpowering.  Given that I got this recipe from a sour cream company's magazine ad, I can see why there's so much.  (Sorry, I can't remember which brand, but I'm leaning towards Daisy.)


After mixing everything really well with a Mix 'n Scraper, I put it in the Round Covered Baker because the dip is actually supposed to bake covered.  This is a great piece from the Stoneware Collection because you can do so much with it: bake chicken, microwave a delicious risotto, and more.  To finish the dip, bake it, top it with garnish, and serve to friends!  Oh, and get ready to share the recipe!  Enjoy!


Like the products you saw used?
Shop Online 24/7 at pamperedchef.biz/jennylyn
E-mail me: chefjennylyn[at]gmail.com
Call me up: (205) 585-2464