Wednesday, October 30, 2013

Kung Pao Tofu


My dad gave Betsy this great Chinese cookbook, Chinese Cuisine Made Simple by Dorothy Huang (even had it autographed!), and it's proven a great resource as Betsy has strived to learn new tricks and techniques.  When she told me she'd like me to make this recipe for her and Jason because it was one of his favorites, I was a bit intimidated.  I mean, Kung Pao Tofu?  I'd never even heard of dry tofu, and I didn't like the thought of making something Jason really liked after he'd had Betsy's version.  Anyway, I dove in, and I was pretty pleased with the results.  Here's to trying new things!

Kung Pao Tofu
chefjennylyn.com

1/2 pound dry tofu
1 red bell pepper

Seasoning Sauce:
1 tsp. cornstarch
1 tsp. sugar
1/8 tsp. freshly ground pepper
1 tbsp. rice vinegar
1 tbsp. soy sauce
2 tbsp. Hoisin sauce
2 tbsp. water
1/2 tsp. sesame oil

2 tbsp. cooking oil
6 dried chili peppers
1 tsp. minced garlic
Salt, to taste
1/2 cup roasted peanuts
1 tbsp. chopped green onion

Cut dry tofu and bell pepper into 1/2-inch dice
Combine seasoning sauce ingredients in a small bowl.
Heat 2 tbsp. oil in a wok over high heat.  Add dried chili peppers, and cook until they are almost black.  Add ginger, tofu, and bell pepper.  Stir-fry for 2 minutes.
Pour in sauce.  Stir a few seconds.  Salt to taste.  Add peanuts.  Remove to a serving platter.  Discard red chili peppers.  Sprinkle chopped green onion on top.

Note: I skipped the chili peppers and the green onion at the end.


I love the Forged Cutlery Collection, and one thing that's so great is the sharpener.  Betsy has been preoccupied with pregnancy and birthing her first child, so I understood when her knives struck me as a little dull... all of them.  A few swipes on the Knife Shapener, and they were as good as new!  This also works for other brands, by the way.


I'm using my favorite knife, the 5" Santoku, to dice my tofu and pepper.  Ingredients are going into 2-Cup Prep Bowls, and everything is resting on a Large Cutting Board.  Love love love this cutting board!


Hoisin sauce, peanut butter, shortening, honey - These types of ingredients are kind of annoying to measure, but the Measure-All Cup takes them to school.  Push to the measurement you want, fill the cup, and pop the ingredient right out.  So simple!  Other ingredients are in the Measuring Spoon Set and the Easy Read Mini Measuring Cup.  That's the Small Batter Bowl I'm using for my sauce, and I've got the Mini Mix 'n Scraper to stir it all up.


Betsy did me a solid and showed me her method for roasting peanuts.  They're pretty common in Chinese cooking, and her husband also enjoys them as a snack.  In short, Betsy has become the peanut master.  A bit of oil, a bit of heat, and a constant stir.  Done!  This is the Stir-Fry Skillet from the Executive Cookware Collection, and Betsy is using a Bamboo Spatula.

 
This is where things get hairy.  There will be no other pictures until the finished product because high heat, oil, and steady ingredient additions simply don't equal, "Oh, time for a great shot!"  That said, I rocked this recipe like a hurricane.  I could have been on the Food Network with my mad skills.  Why so simple?  Yeah, that would be the prep work I did ahead of time.  Notice that every step is in its respective bowl or measuring cup.  My sauce is mixed, pepper and tofu are prepped, and the peanuts are sitting measured and ready.  Do not attempt a stir-fry without prepping!  It's a recipe for burning food, smoking up the kitchen, and *probably* setting off the smoke alarm.  Ask me how I know.
 
 
Beautiful kung pao tofu!  This turned out to be a great dish that I plan to make again once I get home.  Now that I know what dry tofu looks like, I think I can pull it off.  I'm pretty sure you can, too!

Like the products you saw used?
Shop Online 24/7 at pamperedchef.biz/jennylyn
E-mail me: chefjennylyn[at]gmail.com
Call me up: (205) 585-2464


Tuesday, October 29, 2013

Famous Kona Inn Banana Bread

 
When my sister was a student at the University of Alabama, the school produced a cookbook entitled, Nothing but the Best!.  It was a beautiful hardbound collection of recipes from the staff, and the cover featured a picture of the President's Mansion, located right in the heart of the school's campus.  Betsy, ever the thoughtful gift giver, got a copy for her and me to give our mom, and it was a huge hit!  Mom loved cookbooks, and this one was extra special because it came from her girls.  Now the book is in Betsy's kitchen, and she and I get to cook from it when I'm in town.
 
This banana bread said it was famous, and I confirmed this with a quick Google search.  Sure enough, the Kona Inn treat is well known, but the recipes vary.  (Some even called for shortening.)  What's the real Kona Inn banana bread?  I have no idea, but I guess it could be this one?  All I know is that this is a delicious recipe, one Betsy knew was a keeper the first time she made it, and one I know you can trust to deliver the results you want in your own kitchen.  With how long it takes to let bananas go bad, measure ingredients, and bake, no one's got time for mediocre.  Just trust me, and let the frangrance of bananas, butter, and all that good stuff fill your home soon.
 
Lastly, Roll Tide!
 
Famous Kona Inn Banana Bread
chefjennylyn.com
 
6 large bananas, ripened
2 1/2 cups plain flour
1 tsp. salt
2 tsp. baking soda
1 cup butter, softened
2 cups sugar
3 large eggs
 
In first bowl, mash bananas and set aside.
In second bowl, sift together flour, salt, and baking soda. Set aside.
In large bowl, cream together butter, sugar, and eggs.  Add dry ingredients and bananas alternately to creamed mixture.  Mix well.
Pour into prepared loaf pans. (2 standard or 4 small)
Bake for 60 minutes or until toothpick comes out clean. (Check after 30 min. for small pans)


I absolutely adore the Pampered Chef Measuring Spoon Set.  They're good and sturdy, but they have proven the most functional spoons I've ever used.  The design of the heads gets them in any spice jar, which you know is a really big deal.  Then there are these little flat parts on the back that let you set the spoons down and leave them full of liquid ingredients.  That's HUGE!


It's always a good idea to crack eggs into a small bowl before adding them to a recipe.  This helps you ensure there's no blood in the egg, but it also leaves you able to get shell out of the egg much more easily.  I used a 1-Cup Prep Bowl for this, and then I put all of the eggs in a Stainless Mixing Bowl for a quick whisking.


Mashing bananas is kind of annoying if you don't have the right tools, but the Mix 'n Chop makes it crazy easy.  This tool was specifically designed for cooking ground beef and sausage in a skillet, but I love it for all kinds of things outside the pan.  Mashing bananas, avocados, potatoes, and more.  Just scroll down to see what it did to this fruit in less than a minute!


Ok, ingredients are prepped and ready.  Bananas are in a Stainless Mixing Bowl, the flour mixture is in a Classic Batter Bowl, eggs are in another Stainless Mixing Bowl, and sugar is in a 2-Cup Prep Bowl.  I've got everything on my Large Cutting Board, which I use regularly to keep my counter clean while cooking.


The Stainless Mixing Bowls and the Scraper Collection are two of my favorite Pampered Chef lines.  Honestly, all three of the bowls and all five of the scrapers end up dirty every time I make a meal.  Then they all go right into the dishwasher for the next use... ah, dishwashers... What did people do without them?


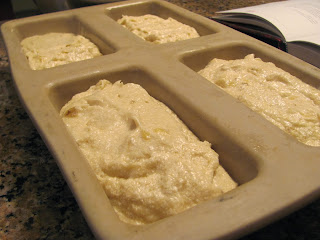
Betsy and I used the Mini-Loaf Pan instead of the standard loaf pans because we each think minis are more convenient.  First of all, the baking time is shorter.  Secondly, you can share bread much more easily (That's important when you consider this is a whole lot of butter and sugar you don't need to keep around).  Lastly, it's super simple to enjoy one loaf and freeze the others for later.  This pan is from the Stoneware Collection, and like the rest of the pieces found there, it heats evenly and delivers perfect baking results.  No hard ends on your bread loaves!

Ok, so there you have it - the banana bread that may or may not be Kona's Famous but is definitely delicious.  Enjoy baking this for yourself or sharing it with a friend.  One tip for sharing: Take people the recipe because you will be asked for it; it's that good.

Like the products you saw used?
Shop Online 24/7 at pamperedchef.biz/jennylyn
E-mail me: chefjennylyn[at]gmail.com
Call me up: (205) 585-2464


Monday, October 28, 2013

How to Cut a Watermelon

It's October, and there are still watermelons in Houston, Texas.  I'm here helping my sister and her husband, as you may remember from recent posts, but here's something new: One of my duties is being the official watermelon cutter.  While I was preparing the latest melon, I decided to share my cutting method with you.  Slicing a watermelon is super simple for some people.  For others of us, it's kind of intimidating... until now.

Step 1: Slice the melon in half.

This just makes the thing more manageble, and that's important when you consider the size of your knife and the fondness you have for keeping your fingers intact.


Step 2: Slice the end off of one half, and turn the melon on its fat end. (For a base)

Here, I'm using the Large Cutting Board with the juice well side facing up.  Notice what I'm not using... layers of newspaper.  That's the 7" Santoku Knife from the Forged Cutlery Collection, by the way.


Step 3: Follow the curve of the melon with your knife, and slice the rind away, one piece at a time.

That's right - Get in there, and enjoy not wasting all the pink stuff.


See what you end up with?  A huge, pink mountain of delicious watermelon.


Step 4: Slice the mountain in half, and dice it however you see fit.  Then do the same with the other half.

We all have our own preferences.  I prefer small pieces of watermelon I can easily fit in a bowl, but you might be a fork and knife kind of eater.  This is where you can get crazy and do whatever you want!


Step 5: Repeat with the other watermelon half.


It's this easy.  Notice in this picture how the Large Cutting Board has caught the juice.  You know what else this piece did?  It kept my watermelon from sliding around!  That's pretty important because this knife is huge and sharp.  Again, I used the Large Cutting Board, the 7" Santoku Knife, and that huge bowl that held everything? That's one of the Stainless Mixing Bowls.

Enjoy your October watermelon if you're in Houston!  If not, I trust that you'll keep this post for Memorial Day, 2014!

Like the products you saw used?
Shop Online 24/7 at pamperedchef.biz/jennylyn
E-mail me: chefjennylyn[at]gmail.com
Call me up: (205) 585-2464


Saturday, October 26, 2013

Parmesan Roasted Potatoes


I doubt I'm the only person whose heart flutters a bit when she sees a nice pile of perfectly roasted potatoes on her plate.  I mean, who doesn't like hot, delicious, perfectly seasoned spuds?  Add some cheese to the equation, and we're talking heavenly!  My sister and I enjoy sharing recipes with one another, and as much as we appreciate a main dish suggestion, we find ourselves indebted to one another over a successful side.  I mean, side dishes are tough!  You can spend a ton of time and energy on them, and what if they're failures?  (This is where I still find myself mourning the butternut squash bread pudding that cost a fortune but tasted horrible... the one that my dad specifically asked me to never make again... the one that taught me a magazine can make a picture look pretty all day long, but pretty doesn't always translate to edible.)  When Betsy told me she'd found a potato dish she knew would be a steady repeat for her, I was sold.  Now it's in my arsenal, and I'd like to extend it to yours.

Parmesan Roasted Potatoes
chefjennylyn.com

4 cups cubed Yukon Gold potatoes
3 tbsp. olive oil
1 tsp. garlic salt
1/2 tsp. salt
2 tsp. paprika
1 tsp. pepper
4 tbsp. Parmesan cheese

Preheat the oven to 425 degrees.
Rub your stoneware with a little bit of olive oil to make sure that beautiful, delicious cheese doesn't stick.  Let's not leave any of it behind, friends.

Cube the potatoes to about 3/4-inch on all sides.  Place them in the dish.
Pour remaining ingredients over the potatoes, and mix everything together, making sure potatoes are coated well.
Bake for 30 minutes.  Then stir everything up, and bake another 15-25 minutes, letting them get golden and crispy.
Add a dusting of sea salt if you'd like.

* From one of Betsy's favorite blogs, What's Gabby Cooking.
 

I'm still at her house, so I had my sister helping on this recipe.  She measured the paprika into a Pinch Bowl while I cubed the potatoes.  She's using a spoon from the Measuring Spoon Set here.  I love how short this ingredient list is because it means I don't have to feel guilty getting help from someone who just had a baby!


Dicing potatoes!  These are on the Large Cutting Board, my favorite cutting board ever!  It has a large surface area, and then it goes right into the dishwasher.  Let's not even get started on its non-slip grippy sides.  Ok, so I'm using the 5" Santoku Knife, which is obviously covered in potato starch, and I'm putting my finished pieces in a Stainless Mixing Bowl.


Big, beautiful pile of potatoes... sign me up!


Potatoes are in the Square Baker, and other ingredients are measured into the Easy Read Mini Measuring Cup, the 1/4-Cup from the Measuring Cup Set, and a Pinch Bowl.


Grab your Mix 'n Scraper, give everything a good toss, and you're done!  Get ready for your house to smell delicious and for your dinner to be divine.  Enjoy!

Like the products you saw used?
Shop Online 24/7 at pamperedchef.biz/jennylyn
E-mail me: chefjennylyn[at]gmail.com
Call me up: (205) 585-2464


Friday, October 25, 2013

Tomato Ricotta Tart

 
This is another recipe from visiting my sister and her husband. You might be wondering about the fact that I'm in another city, yet there are plenty of Pampered Chef products at my disposal. Well, I'm in my 13th year of business, and my sister has been my best customer. In short, cooking at her house is about like cooking in my own. All Pampered Chef all the time. So no, I didn't bring knives on the plane.

Betsy and I sat down and pulled several things we'd like to try from her stack of Cooking Light magazines, and this tart was something we had in mind for a casual sister brunch. That's a funny thought when there's a two-week-old in the house, but ignorance is bliss, right? Well, at least ignorance gets you to buy vine-ripe tomatoes and expensive cheese that you'd hate to see wasted. I had a lunch with a fellow consultant scheduled yesterday, and I didn't want to leave my sister alone without a treat. I was determined to get this cooked and the kitchen cleaned before I left, and I actually accomplished it! Read: This is my disclaimer for the lack of crust prettiness you'll see when you scroll down.
 
 Tomato Ricotta Tart
chefjennylyn.com
 
Crust:
5.6 ounces unbleached all-purpose flour (about 1 1/4 cups)
2 tablespoons pine nuts, toasted and coarsely chopped
1/4 teaspoon kosher salt
1/4 teaspoon baking powder
1/4 teaspoon freshly ground black pepper
1/4 cup extra-virgin olive oil
3 tablespoons ice water
 

Filling:
3/4 cup part-skim ricotta cheese
1 large egg, lightly beaten
2 garlic cloves, minced
1/2 teaspoon kosher salt
1/2 cup chopped fresh basil, divided
1.5 ounces aged Gruyère cheese, shredded and divided (about 6 tablespoons)
1 pound heirloom tomatoes, seeded and cut into 1/4-inch-thick slices
 
Preheat oven to 450°.

To prepare crust, weigh or lightly spoon flour into dry measuring cups; level with a knife. Combine flour and next 4 ingredients (through pepper) in a food processor; pulse 3 times or until combined. Combine oil and 3 tablespoons ice water in a small bowl. With processor on, slowly add oil mixture through food chute, and process until dough is crumbly. Sprinkle dough into a 9-inch glass or ceramic pie plate coated with cooking spray. Press dough into an even layer in bottom and up sides of dish. Bake at 450° for 10 minutes. Remove from oven.

Combine ricotta, egg, garlic, and 1/2 teaspoon salt, stirring with a whisk. Add 1/4 cup basil and 1/4 cup Gruyère cheese, stirring to combine. Spread ricotta mixture evenly over crust. Arrange tomato slices in a circular pattern over ricotta mixture, slightly overlapping. Sprinkle tomatoes with remaining 2 tablespoons Gruyère cheese. Bake at 450° for 25 minutes or until filling is set. Let stand 10 minutes. Sprinkle with remaining 1/4 cup basil.


Above, several ingredients are in the Deep Dish Pie Plate (This one is blue, but it comes in cranberry.), and I've got a Bar Board, a Cutting Mat, The Easy Read Measuring Cups, Measuring Cup Set, and a 4" Serrated Knife ready to go.  Oh, and salt is in a Pinch Bowl.


Have you ever used the Pampered Chef Garlic Press?  If not, let me just tell you it's amazing.  I've had mine since 2000, and it still works perfectly.  You don't have to peel the garlic!  See the garlic coming out of there?  See the picture below with the peel on my Bar Board?  Yep.  Anyway, this is going into the 2-Qt. Stainless Mixing Bowl for my filling mixture.  In the background, I've got the Measure-All Cup and a 1-Cup Prep Bowl.


The Measure-All Cup is one of those products the people who have it want to tell everyone about.  When you go from measuring peanut butter and other sticky ingredients in a standard cup to one that pops it out like a syringe, it's worth talking about.  Here, I've got my ricotta popped and ready to scrape right into my mixing bowl.


I'm just going to admit that Betsy had to help me with her food processor.  I measured out the crust ingredients, but she did the actual mixture for me.  To the right of the processor, I've got Pinch Bowls, Measuring Cups, the Easy Read Mini Measuring Cup, and a 2-Cup Prep Bowl on a Flexible Cutting Mat.  Do you see the nuts we used in the crust?  They're not pine nuts, but have you seen the price on those lately?  When deciding whether to purchase a small jar of pine nuts or twenty ounces of gold, Betsy and I quickly decided the walnuts she already had in her pantry surely couldn't ruin this crust.  You know what?  We were right.


The 4 1/2" Serrated Knife from the Forged Cutlery Collection is my favorite for slicing tomatoes.  The skins are no match for this blade, and the knife is really easy to handle.  I've got the Bar Board for the tomatoes and a Cutting Mat because I just didn't move it out of the way.


This crust could have been pretty, but I was in a rush.  Instead of trying to spread it evenly, I just decided to make sure it would hold filling.  That said, the crust was great!  It can definitely be used for other savory recipes like quiche and... quiche?


Hello, Gruyere!  Ok, so this was delicious!  However, if you already have sharp white cheddar or another cheese you want to try in this recipe, don't feel the need to buy anything else.  The recipe doesn't call for much, and other cheeses will substitute nicely.  I used the Rotary Grater to grate the cheese into an Easy Read Measuring cup.


Spread your filling, layer your tomatoes, grate a little more cheese over the top, and you're ready to bake!  This really was a great recipe, and I can see myself serving it for a fun brunch sometime.  This is woman food at its best!
 
Like the products you saw used?
Shop Online 24/7 at pamperedchef.biz/jennylyn
E-mail me: chefjennylyn[at]gmail.com
Call me up: (205) 585-2464


Thursday, October 24, 2013

Chicken Yakitori Rice Bowls


I know you're shocked to see a new recipe from me, but see my last post for why I've been away.  The bottom line, however, is that I'm back, and I'm eating chicken yakitori rice bowls!

My sister had a baby two weeks ago, and I came to Houston to help her and her husband for a little while.  You know, making sure they have food and all of that good stuff.  Tonight I made this Asian dish that I'll be sure to repeat at home.  It's kind of funny because my sister and I both married Asian men, so we enjoy sharing recipes suited to their palates.  (Before you say it, yes, my sister's little Chinese baby is absolutely adorable!)

Chicken Yakitori Rice Bowls
chefjennylyn.com

2 (3.5-ounce) bags boil-in-bag basmati rice
1/4 cup lower-sodium soy sauce
1/4 cup mirin (sweet rice wine)
3 tablespoons sugar
1 tablespoon rice vinegar
2 tablespoons fat-free, lower-sodium chicken broth
3 teaspoons peanut oil, divided
1 pound skinless, boneless chicken thighs
8 ounces snow peas, halved lengthwise diagonally
1 bunch green onions, cut into 1-inch pieces

Cook rice according to package directions, omitting salt and fat.

Combine soy sauce and next 4 ingredients (through broth) in a small saucepan; bring to a boil. Reduce heat; simmer 3 minutes. Remove from heat.

Heat a large nonstick skillet or wok over medium-high heat. Add 2 teaspoons oil to pan; swirl to coat. Add chicken thighs to pan; cook 3 minutes on each side or until browned. Transfer to a cutting board; cool slightly. Cut into (1-inch) strips.

Return pan to medium-high heat; add remaining 1 teaspoon oil to pan. Add snow peas and onions; sauté 2 minutes. Add soy sauce mixture and chicken to pan; cook 2 minutes or until liquid is syrupy and chicken is thoroughly heated, stirring frequently. Place 1 cup rice in each of 4 shallow bowls; top each serving with 1 cup chicken mixture.

Update: I just posted the Asian Broccoli served with this dish.


You need to look at all of one of my posts to realize I'm a huge fan of prep work.  Not like, "Oh, I enjoy it!" but more like, "This will keep me from completely screwing up this recipe."  I have especially come to appreciate prep as I've done more Asian recipes that involve high heat and quick cooking.  In short, when there's a stir-fry happening, it's not the time to try measuring out rice vinegar.  In the above picture, I've got my sugar in a Pinch Bowl with a Measuring Spoon sticking out, and my liquid ingredients are in Easy-Read Measuring Cups.  Then I've got a 1.5-Qt. Executive Saucepan, and everything is resting on the Flexible Cutting Mats.  Why two mats?  Because I was too lazy to get one out from underneath the other.  Sorry.


I like a knife that makes quick work of a full bunch of green onions.  The 5" Santoku Knife from the Forged Cutlery Collection is my absolute favorite knife ever!  I use it constantly, and it's the one I always recommend people try first if they prefer to build a set one knife at a time.  Here, I'm using it on a Flexible Cutting Mat, and I'm putting my sliced onions in the 2-Qt. Stainless Mixing Bowl.


Soooo... Here's what happened with the chicken.  Betsy and I were going to make our mom's chicken & dumplings recipe, but we quickly decided that was a little ambitious considering that one of us just had a baby, and the other just wasn't up to trying and failing.  That decision was made after purchasing a whole chicken, so then came the question of what to do with the bird.  Ever the resourceful home chef, I decided I'd just cut the dark meat up for this recipe instead of buying boneless, skinless thighs.  Then I opened the package and found whatever this thing is.  Um, is that the spine or something?  There's only one thing to do when you're in charge of putting dinner on the table for new parents, and that's to power through.  Enter: wine.  A couple of hearty gulps, and I was able to manhandle the pieces of chicken that were actually, well, pieces of chicken.  Wash your hands between touching the meat and wine, kids.  No cross contamination!  (That's the Large Cutting Board, by the way.)


I cut the chicken before cooking it since I used whole. pieces. of. the. dead. bird., so my pictures are going to look different from what you'll read in the recipe.  That's the Stir-Fry Skillet, and I'm making magic with the Bamboo Spatula Set.


Then comes the color!  How great does it look with those snow peas and onions?  Oh, and you should have smelled that delicious sauce hit the pan!


This really was a great dish, one I'm looking forward to making my husband soon.  Thanks, Cooking Light, for yet another big hit!

 
Does this face say, "Wow, that yakitori stuff smells delicious!" or what?
 
Like the products you saw used?
Shop Online 24/7 at pamperedchef.biz/jennylyn
E-mail me: chefjennylyn[at]gmail.com
Call me up: (205) 585-2464


Saturday, October 19, 2013

I'm back... with a new last name!


Do you notice anything about the above picture?  Perhaps the dress?  Maybe the handsome man in the sexy suit directly to my left?  You guessed it - I got married!  I tied the knot in Birmingham on July 13th of this year, and I am now living the life of wedded bliss!  Eeeeee!

So what does all of this mean?  Well, several things, but I'll just cover one - my MIA-ness when it came to my beloved blog.  My husband and I were in a long-distance relationship (Alabama/Minnesota), and I was traveling to see him every ten days.  That didn't leave me a lot of time to cook, photograph, and post much while I was home.  To be honest, I didn't even keep a kitchen stocked with enough ingredients to make anything for a long time because as soon as I would buy groceries, it would be time to leave town, and you know how that goes...  In short, I did a lot of eating out, eating at friends' houses (not in a freeloader kind of way - promise!), and snacking on things that kept well.  I don't mind if I never see another apple paired with goat cheese.

Let's fast-forward to the here and now and how this affects you.  I'm back.  That's right, friends - I'm going to be sharing more recipes, fabulous Pampered Chef products, and even a silly story here and there.  I'm cooking more than ever now that I don't eat alone, and the majority of it is really good! 

I'm looking forward to sharing my life and recipes with you again, but for now let me just say thank you.  Thank you to all of you who frequent this blog, those of you who shared how great those stuffed shells were or how well that delicious dip went over at a party.  And thanks to those of you who don't even cook but somehow stick with me!

Here's to the incredible journey the Lord has granted me, the man with whom I now get to share it, and the invitation I am extending to you as you join me at the table.


I am now Jenny-Lyn Yoon!